Quantcast
Channel: damienbod – Software Engineering
Viewing all 354 articles
Browse latest View live

Implementing custom policies in ASP.NET Core using the HttpContext

$
0
0

This article shows how to implement a custom ASP.NET Core policy using the AuthorizationHandler class. The handler validates, that the identity from the HttpContext has the authorization to update the object in the database.

Code: https://github.com/damienbod/AspNetCoreAngularSignalRSecurity

Scenerio

In the example, each admin user of the client application, can create DataEventRecord entities which can only be accessed by the corresponding identity. If a different identity with a different user sends a PUT request to update the object, a 401 response is returned. Because the Username from the identity is saved in the database for each entity, the custom policy can validate the identity and the entity to be updated.

Creating the Requirement for the Policy

A simple requirement is created for the policy implementation. The AuthorizationHandler implementation requires this and the requirement class is also used to add the policy to the application.

using Microsoft.AspNetCore.Authorization;

namespace ApiServer.Policies
{
    public class CorrectUserRequirement : IAuthorizationRequirement
    {
        public class CorrectUserRequirement : IAuthorizationRequirement{}
    }
}

Creating the custom Handler for the Policy

If a method is called, which is protected by the CorrectUserHandler, the HandleRequirementAsync is executed. In this method, the id of the object to be updated is extracted from the url path. The id is then used to select the Username from the database, which is then compared to the Username from the HttpContext identity name. If the values are not equal, no success message is returned.

using ApiServer.Repositories;
using Microsoft.AspNetCore.Authorization;
using System;
using System.Threading.Tasks;

namespace ApiServer.Policies
{
    public class CorrectUserHandler : AuthorizationHandler<CorrectUserRequirement>
    {
        private readonly IDataEventRecordRepository _dataEventRecordRepository;

        public CorrectUserHandler(IDataEventRecordRepository dataEventRecordRepository)
        {
            _dataEventRecordRepository = dataEventRecordRepository;
        }

        protected override Task HandleRequirementAsync(AuthorizationHandlerContext context, CorrectUserRequirement requirement)
        {
            if (context == null)
                throw new ArgumentNullException(nameof(context));
            if (requirement == null)
                throw new ArgumentNullException(nameof(requirement));

            var authFilterCtx = (Microsoft.AspNetCore.Mvc.Filters.AuthorizationFilterContext)context.Resource;
            var httpContext = authFilterCtx.HttpContext;
            var pathData = httpContext.Request.Path.Value.Split("/");
            long id = long.Parse(pathData[pathData.Length -1]);

            var username = _dataEventRecordRepository.GetUsername(id);
            if (username == httpContext.User.Identity.Name)
            {
                context.Succeed(requirement);
            }

            return Task.CompletedTask;
        }
    }
}

Adding the policy to the application

The custom policy is added to the ASP.NET Core application using the AddAuthorization extension using the requirement.

services.AddAuthorization(options =>
{
	...
	options.AddPolicy("correctUser", policyCorrectUser =>
	{
		policyCorrectUser.Requirements.Add(new CorrectUserRequirement());
	});
});

Using the policy in the ASP.NET Core controller

The PUT method uses the correctUser policy to authorize the request.

[Authorize("dataEventRecordsAdmin")]
[Authorize("correctUser")]
[HttpPut("{id}")]
public IActionResult Put(long id, [FromBody]DataEventRecordDto dataEventRecordDto)
{
	_dataEventRecordRepository.Put(id, dataEventRecordDto);
	return NoContent();
}

If a user logs in, and tries to update an entity belonging to a different user, the request is rejected.

Links:

https://docs.microsoft.com/en-us/aspnet/core/security/authorization/policies


Shared Localization in ASP.NET Core MVC

$
0
0

This article shows how ASP.NET Core MVC razor views and view models can use localized strings from a shared resource. This saves you creating many different files and duplicating translations for the different views and models. This makes it much easier to manage your translations, and also reduces the effort required to export, import the translations.

Code: https://github.com/damienbod/AspNetCoreMvcSharedLocalization

A default ASP.NET Core MVC application with Individual user accounts authentication is used to create the application.

A LocService class is used, which takes the IStringLocalizerFactory interface as a dependency using construction injection. The factory is then used, to create an IStringLocalizer instance using the type from the SharedResource class.

using Microsoft.Extensions.Localization;
using System.Reflection;

namespace AspNetCoreMvcSharedLocalization.Resources
{
    public class LocService
    {
        private readonly IStringLocalizer _localizer;

        public LocService(IStringLocalizerFactory factory)
        {
            var type = typeof(SharedResource);
            var assemblyName = new AssemblyName(type.GetTypeInfo().Assembly.FullName);
            _localizer = factory.Create("SharedResource", assemblyName.Name);
        }

        public LocalizedString GetLocalizedHtmlString(string key)
        {
            return _localizer[key];
        }
    }
}

The dummy SharedResource is required to create the IStringLocalizer instance using the type from the class.

namespace AspNetCoreMvcSharedLocalization.Resources
{
    /// <summary>
    /// Dummy class to group shared resources
    /// </summary>
    public class SharedResource
    {
    }
}

The resx resource files are added with the name, which matches the IStringLocalizer definition. This example uses SharedResource.de-CH.resx and the other localizations as required. One of the biggest problems with ASP.NET Core localization, if the name of the resx does not match the name/type of the class, view using the resource, it will not be found and so not localized. It will then use the default string, which is the name of the resource. This is also a problem as we programme in english, but the default language is german or french. Some programmers don’t understand german. It is bad to have german strings throughout the english code base.

The localization setup is then added to the startup class. This application uses de-CH, it-CH, fr-CH and en-US. The QueryStringRequestCultureProvider is used to set the request localization.

public void ConfigureServices(IServiceCollection services)
{
	...

	services.AddSingleton<LocService>();
	services.AddLocalization(options => options.ResourcesPath = "Resources");

	services.AddMvc()
		.AddViewLocalization()
		.AddDataAnnotationsLocalization(options =>
		{
			options.DataAnnotationLocalizerProvider = (type, factory) =>
			{
				var assemblyName = new AssemblyName(typeof(SharedResource).GetTypeInfo().Assembly.FullName);
				return factory.Create("SharedResource", assemblyName.Name);
			};
		});

	services.Configure<RequestLocalizationOptions>(
		options =>
		{
			var supportedCultures = new List<CultureInfo>
				{
					new CultureInfo("en-US"),
					new CultureInfo("de-CH"),
					new CultureInfo("fr-CH"),
					new CultureInfo("it-CH")
				};

			options.DefaultRequestCulture = new RequestCulture(culture: "de-CH", uiCulture: "de-CH");
			options.SupportedCultures = supportedCultures;
			options.SupportedUICultures = supportedCultures;

			options.RequestCultureProviders.Insert(0, new QueryStringRequestCultureProvider());
		});

	services.AddMvc();
}

The localization is then added as a middleware.

public void Configure(IApplicationBuilder app, IHostingEnvironment env)
{
	...

	var locOptions = app.ApplicationServices.GetService<IOptions<RequestLocalizationOptions>>();
	app.UseRequestLocalization(locOptions.Value);

	app.UseStaticFiles();

	app.UseAuthentication();

	app.UseMvc(routes =>
	{
		routes.MapRoute(
			name: "default",
			template: "{controller=Home}/{action=Index}/{id?}");
	});
}

Razor Views

The razor views use the shared resource localization by injecting the LocService. This was registered in the IoC in the startup class. The localized strings can then be used as required.

@model RegisterViewModel
@using AspNetCoreMvcSharedLocalization.Resources

@inject LocService SharedLocalizer

@{
    ViewData["Title"] = @SharedLocalizer.GetLocalizedHtmlString("register");
}
<h2>@ViewData["Title"]</h2>
<form asp-controller="Account" asp-action="Register" asp-route-returnurl="@ViewData["ReturnUrl"]" method="post" class="form-horizontal">
    <h4>@SharedLocalizer.GetLocalizedHtmlString("createNewAccount")</h4>
    <hr />
    <div asp-validation-summary="All" class="text-danger"></div>
    <div class="form-group">
        <label class="col-md-2 control-label">@SharedLocalizer.GetLocalizedHtmlString("email")</label>
        <div class="col-md-10">
            <input asp-for="Email" class="form-control" />
            <span asp-validation-for="Email" class="text-danger"></span>
        </div>
    </div>
    <div class="form-group">
        <label class="col-md-2 control-label">@SharedLocalizer.GetLocalizedHtmlString("password")</label>
        <div class="col-md-10">
            <input asp-for="Password" class="form-control" />
            <span asp-validation-for="Password" class="text-danger"></span>
        </div>
    </div>
    <div class="form-group">
        <label class="col-md-2 control-label">@SharedLocalizer.GetLocalizedHtmlString("confirmPassword")</label>
        <div class="col-md-10">
            <input asp-for="ConfirmPassword" class="form-control" />
            <span asp-validation-for="ConfirmPassword" class="text-danger"></span>
        </div>
    </div>
    <div class="form-group">
        <div class="col-md-offset-2 col-md-10">
            <button type="submit" class="btn btn-default">@SharedLocalizer.GetLocalizedHtmlString("register")</button>
        </div>
    </div>
</form>
@section Scripts {
    @{ await Html.RenderPartialAsync("_ValidationScriptsPartial"); }
}

View Model

The models validation messages are also localized. The ErrorMessage of the attributes are used to get the localized strings.

using System.ComponentModel.DataAnnotations;

namespace AspNetCoreMvcSharedLocalization.Models.AccountViewModels
{
    public class RegisterViewModel
    {
        [Required(ErrorMessage = "emailRequired")]
        [EmailAddress]
        [Display(Name = "Email")]
        public string Email { get; set; }

        [Required(ErrorMessage = "passwordRequired")]
        [StringLength(100, ErrorMessage = "passwordStringLength", MinimumLength = 8)]
        [DataType(DataType.Password)]
        [Display(Name = "Password")]
        public string Password { get; set; }

        [DataType(DataType.Password)]
        [Display(Name = "Confirm password")]
        [Compare("Password", ErrorMessage = "confirmPasswordNotMatching")]
        public string ConfirmPassword { get; set; }
    }
}

The AddDataAnnotationsLocalization DataAnnotationLocalizerProvider is setup to always use the SharedResource resx files for all of the models. This prevents duplicating the localizations for each of the different models.

.AddDataAnnotationsLocalization(options =>
{
	options.DataAnnotationLocalizerProvider = (type, factory) =>
	{
		var assemblyName = new AssemblyName(typeof(SharedResource).GetTypeInfo().Assembly.FullName);
		return factory.Create("SharedResource", assemblyName.Name);
	};
});

The localization can be tested using the following requests:

https://localhost:44371/Account/Register?culure=de-CH&ui-culture=de-CH
https://localhost:44371/Account/Register?culure=it-CH&ui-culture=it-CH
https://localhost:44371/Account/Register?culure=fr-CH&ui-culture=fr-CH
https://localhost:44371/Account/Register?culure=en-US&ui-culture=en-US

The QueryStringRequestCultureProvider reads the culture and the ui-culture from the parameters. You could also use headers or cookies to send the required localization in the request, but this needs to be configured in the Startup class.

Links:

https://docs.microsoft.com/en-us/aspnet/core/fundamentals/localization


IdentityServer4 Localization with the OIDC Implicit Flow

$
0
0

This post shows how to implement localization in IdentityServer4 when using the Implicit Flow with an Angular client.

Code: https://github.com/damienbod/AspNet5IdentityServerAngularImplicitFlow

The problem

When the oidc implicit client calls the endpoint /connect/authorize to authenticate and authorize the client and the identity, the user is redirected to the AccountController login method using the IdentityServer4 package. If the culture and the ui-culture is set using the query string or using the default localization filter, it gets ignored in the host. By using a localization cookie, which is set from the client SPA application, it is possible to use this culture in IdentityServer4 and it’s host.

Part 2 IdentityServer4 Localization using ui_locales and the query string

IdentityServer 4 Localization

The ASP.NET Core localization is configured in the startup method of the IdentityServer4 host. The localization service, the resource paths and the RequestCultureProviders are configured here. A custom LocalizationCookieProvider is added to handle the localization cookie. The MVC middleware is then configured to use the localization.

public void ConfigureServices(IServiceCollection services)
{
	...

	services.AddSingleton<LocService>();
	services.AddLocalization(options => options.ResourcesPath = "Resources");

	services.AddAuthentication();

	services.AddIdentity<ApplicationUser, IdentityRole>()
	.AddEntityFrameworkStores<ApplicationDbContext>();

	services.Configure<RequestLocalizationOptions>(
		options =>
		{
			var supportedCultures = new List<CultureInfo>
				{
					new CultureInfo("en-US"),
					new CultureInfo("de-CH"),
					new CultureInfo("fr-CH"),
					new CultureInfo("it-CH")
				};

			options.DefaultRequestCulture = new RequestCulture(culture: "de-CH", uiCulture: "de-CH");
			options.SupportedCultures = supportedCultures;
			options.SupportedUICultures = supportedCultures;

			options.RequestCultureProviders.Clear();
			var provider = new LocalizationCookieProvider
			{
				CookieName = "defaultLocale"
			};
			options.RequestCultureProviders.Insert(0, provider);
		});

	services.AddMvc()
	 .AddViewLocalization()
	 .AddDataAnnotationsLocalization(options =>
	 {
		 options.DataAnnotationLocalizerProvider = (type, factory) =>
		 {
			 var assemblyName = new AssemblyName(typeof(SharedResource).GetTypeInfo().Assembly.FullName);
			 return factory.Create("SharedResource", assemblyName.Name);
		 };
	 });

	...

	services.AddIdentityServer()
		.AddSigningCredential(cert)
		.AddInMemoryIdentityResources(Config.GetIdentityResources())
		.AddInMemoryApiResources(Config.GetApiResources())
		.AddInMemoryClients(Config.GetClients())
		.AddAspNetIdentity<ApplicationUser>()
		.AddProfileService<IdentityWithAdditionalClaimsProfileService>();
}

The localization is added to the pipe in the Configure method.

public void Configure(IApplicationBuilder app, IHostingEnvironment env, ILoggerFactory loggerFactory)
{
	...

	var locOptions = app.ApplicationServices.GetService<IOptions<RequestLocalizationOptions>>();
	app.UseRequestLocalization(locOptions.Value);

	app.UseStaticFiles();

	app.UseIdentityServer();

	app.UseMvc(routes =>
	{
		routes.MapRoute(
			name: "default",
			template: "{controller=Home}/{action=Index}/{id?}");
	});
}

The LocalizationCookieProvider class implements the RequestCultureProvider to handle the localization sent from the Angular client as a cookie. The class uses the defaultLocale cookie to set the culture. This was configured in the startup class previously.

using Microsoft.AspNetCore.Localization;
using System;
using System.Threading.Tasks;
using Microsoft.AspNetCore.Http;

namespace IdentityServerWithIdentitySQLite
{
    public class LocalizationCookieProvider : RequestCultureProvider
    {
        public static readonly string DefaultCookieName = ".AspNetCore.Culture";

        public string CookieName { get; set; } = DefaultCookieName;

        /// <inheritdoc />
        public override Task<ProviderCultureResult> DetermineProviderCultureResult(HttpContext httpContext)
        {
            if (httpContext == null)
            {
                throw new ArgumentNullException(nameof(httpContext));
            }

            var cookie = httpContext.Request.Cookies[CookieName];

            if (string.IsNullOrEmpty(cookie))
            {
                return NullProviderCultureResult;
            }

            var providerResultCulture = ParseCookieValue(cookie);

            return Task.FromResult(providerResultCulture);
        }

        public static ProviderCultureResult ParseCookieValue(string value)
        {
            if (string.IsNullOrWhiteSpace(value))
            {
                return null;
            }

            var cultureName = value;
            var uiCultureName = value;

            if (cultureName == null && uiCultureName == null)
            {
                // No values specified for either so no match
                return null;
            }

            if (cultureName != null && uiCultureName == null)
            {
                uiCultureName = cultureName;
            }

            if (cultureName == null && uiCultureName != null)
            {
                cultureName = uiCultureName;
            }

            return new ProviderCultureResult(cultureName, uiCultureName);
        }
    }
}

The Account login view uses the localization to translate the different texts into one of the supported cultures.

@using System.Globalization
@using IdentityServerWithAspNetIdentity.Resources
@model IdentityServer4.Quickstart.UI.Models.LoginViewModel
@inject SignInManager<ApplicationUser> SignInManager

@inject LocService SharedLocalizer

@{
    ViewData["Title"] = @SharedLocalizer.GetLocalizedHtmlString("login");
}

<h2>@ViewData["Title"]</h2>
<div class="row">
    <div class="col-md-8">
        <section>
            <form asp-controller="Account" asp-action="Login" asp-route-returnurl="@Model.ReturnUrl" method="post" class="form-horizontal">
                <h4>@CultureInfo.CurrentCulture</h4>
                <hr />
                <div asp-validation-summary="All" class="text-danger"></div>
                <div class="form-group">
                    <label class="col-md-4 control-label">@SharedLocalizer.GetLocalizedHtmlString("email")</label>
                    <div class="col-md-8">
                        <input asp-for="Email" class="form-control" />
                        <span asp-validation-for="Email" class="text-danger"></span>
                    </div>
                </div>
                <div class="form-group">
                    <label class="col-md-4 control-label">@SharedLocalizer.GetLocalizedHtmlString("password")</label>
                    <div class="col-md-8">
                        <input asp-for="Password" class="form-control" type="password" />
                        <span asp-validation-for="Password" class="text-danger"></span>
                    </div>
                </div>
                <div class="form-group">
                    <label class="col-md-4 control-label">@SharedLocalizer.GetLocalizedHtmlString("rememberMe")</label>
                    <div class="checkbox col-md-8">
                        <input asp-for="RememberLogin" />
                    </div>
                </div>
                <div class="form-group">
                    <div class="col-md-offset-4 col-md-8">
                        <button type="submit" class="btn btn-default">@SharedLocalizer.GetLocalizedHtmlString("login")</button>
                    </div>
                </div>
                <p>
                    <a asp-action="Register" asp-route-returnurl="@Model.ReturnUrl">@SharedLocalizer.GetLocalizedHtmlString("registerAsNewUser")</a>
                </p>
                <p>
                    <a asp-action="ForgotPassword">@SharedLocalizer.GetLocalizedHtmlString("forgotYourPassword")</a>
                </p>
            </form>
        </section>
    </div>
</div>

@section Scripts {
    @{ await Html.RenderPartialAsync("_ValidationScriptsPartial"); }
}

The LocService uses the IStringLocalizerFactory interface to configure a shared resource for the resources.

using Microsoft.Extensions.Localization;
using System.Reflection;

namespace IdentityServerWithAspNetIdentity.Resources
{
    public class LocService
    {
        private readonly IStringLocalizer _localizer;

        public LocService(IStringLocalizerFactory factory)
        {
            var type = typeof(SharedResource);
            var assemblyName = new AssemblyName(type.GetTypeInfo().Assembly.FullName);
            _localizer = factory.Create("SharedResource", assemblyName.Name);
        }

        public LocalizedString GetLocalizedHtmlString(string key)
        {
            return _localizer[key];
        }
    }
}

Client Localization

The Angular SPA client uses the angular-l10n the localize the application.

 "dependencies": {
    "angular-l10n": "^4.0.0",

the angular-l10n is configured in the app module and is configured to save the current culture in a cookie called defaultLocale. This cookie matches what was configured on the server.

...

import { L10nConfig, L10nLoader, TranslationModule, StorageStrategy, ProviderType } from 'angular-l10n';

const l10nConfig: L10nConfig = {
    locale: {
        languages: [
            { code: 'en', dir: 'ltr' },
            { code: 'it', dir: 'ltr' },
            { code: 'fr', dir: 'ltr' },
            { code: 'de', dir: 'ltr' }
        ],
        language: 'en',
        storage: StorageStrategy.Cookie
    },
    translation: {
        providers: [
            { type: ProviderType.Static, prefix: './i18n/locale-' }
        ],
        caching: true,
        missingValue: 'No key'
    }
};

@NgModule({
    imports: [
        BrowserModule,
        FormsModule,
        routing,
        HttpClientModule,
        TranslationModule.forRoot(l10nConfig),
		DataEventRecordsModule,
        AuthModule.forRoot(),
    ],
    declarations: [
        AppComponent,
        ForbiddenComponent,
        HomeComponent,
        UnauthorizedComponent,
        SecureFilesComponent
    ],
    providers: [
        OidcSecurityService,
        SecureFileService,
        Configuration
    ],
    bootstrap:    [AppComponent],
})

export class AppModule {

    clientConfiguration: any;

    constructor(
        public oidcSecurityService: OidcSecurityService,
        private http: HttpClient,
        configuration: Configuration,
        public l10nLoader: L10nLoader
    ) {
        this.l10nLoader.load();

        console.log('APP STARTING');
        this.configClient().subscribe((config: any) => {
            this.clientConfiguration = config;

            let openIDImplicitFlowConfiguration = new OpenIDImplicitFlowConfiguration();
            openIDImplicitFlowConfiguration.stsServer = this.clientConfiguration.stsServer;
            openIDImplicitFlowConfiguration.redirect_url = this.clientConfiguration.redirect_url;
            // The Client MUST validate that the aud (audience) Claim contains its client_id value registered at the Issuer identified by the iss (issuer) Claim as an audience.
            // The ID Token MUST be rejected if the ID Token does not list the Client as a valid audience, or if it contains additional audiences not trusted by the Client.
            openIDImplicitFlowConfiguration.client_id = this.clientConfiguration.client_id;
            openIDImplicitFlowConfiguration.response_type = this.clientConfiguration.response_type;
            openIDImplicitFlowConfiguration.scope = this.clientConfiguration.scope;
            openIDImplicitFlowConfiguration.post_logout_redirect_uri = this.clientConfiguration.post_logout_redirect_uri;
            openIDImplicitFlowConfiguration.start_checksession = this.clientConfiguration.start_checksession;
            openIDImplicitFlowConfiguration.silent_renew = this.clientConfiguration.silent_renew;
            openIDImplicitFlowConfiguration.post_login_route = this.clientConfiguration.startup_route;
            // HTTP 403
            openIDImplicitFlowConfiguration.forbidden_route = this.clientConfiguration.forbidden_route;
            // HTTP 401
            openIDImplicitFlowConfiguration.unauthorized_route = this.clientConfiguration.unauthorized_route;
            openIDImplicitFlowConfiguration.log_console_warning_active = this.clientConfiguration.log_console_warning_active;
            openIDImplicitFlowConfiguration.log_console_debug_active = this.clientConfiguration.log_console_debug_active;
            // id_token C8: The iat Claim can be used to reject tokens that were issued too far away from the current time,
            // limiting the amount of time that nonces need to be stored to prevent attacks.The acceptable range is Client specific.
            openIDImplicitFlowConfiguration.max_id_token_iat_offset_allowed_in_seconds = this.clientConfiguration.max_id_token_iat_offset_allowed_in_seconds;

            configuration.FileServer = this.clientConfiguration.apiFileServer;
            configuration.Server = this.clientConfiguration.apiServer;

            this.oidcSecurityService.setupModule(openIDImplicitFlowConfiguration);

            // if you need custom parameters
            // this.oidcSecurityService.setCustomRequestParameters({ 'culture': 'fr-CH', 'ui-culture': 'fr-CH', 'ui_locales': 'fr-CH' });
        });
    }

    configClient() {

        console.log('window.location', window.location);
        console.log('window.location.href', window.location.href);
        console.log('window.location.origin', window.location.origin);
        console.log(`${window.location.origin}/api/ClientAppSettings`);

        return this.http.get(`${window.location.origin}/api/ClientAppSettings`);
    }
}

When the applications are started, the user can select a culture and login.

And the login view is localized correctly in de-CH

Or in french, if the culture is fr-CH

Links:

https://damienbod.com/2017/11/11/identityserver4-localization-using-ui_locales-and-the-query-string/

https://damienbod.com/2017/11/01/shared-localization-in-asp-net-core-mvc/

https://github.com/IdentityServer/IdentityServer4

https://docs.microsoft.com/en-us/aspnet/core/fundamentals/localization

https://github.com/robisim74/angular-l10n

IdentityServer4 Localization using ui_locales and the query string

$
0
0

This post is part 2 from the previous post IdentityServer4 Localization with the OIDC Implicit Flow where the localization was implemented using a shared cookie between the applications. This has its restrictions, due to the cookie domain constraints and this post shows how the oidc optional parameter ui_locales can be used instead, to pass the localization between the client application and the STS server.

Code: https://github.com/damienbod/AspNet5IdentityServerAngularImplicitFlow

The ui_locales, which is an optional parameter defined in the OpenID standard, can be used to pass the localization from the client application to the server application in the authorize request. The parameter is passed as a query string value.

A custom RequestCultureProvider class is implemented to handle this. The culture provider checks for the ui_locales in the query string and sets the culture if it is found. If it is not found, it checks for the returnUrl parameter. This is the parameter returned by the IdentityServer4 middleware after a redirect from the /connect/authorize endpoint. The provider then searches for the ui_locales in the parameter and sets the culture if found.

Once the culture has been set, a localization cookie is set on the server and added to the response. The will be used if the client application/user tries to logout. This is required because the culture cannot be set for the endsession endpoint.

using Microsoft.AspNetCore.Localization;
using System;
using System.Threading.Tasks;
using Microsoft.AspNetCore.Http;
using Microsoft.Extensions.Primitives;
using Microsoft.AspNetCore.WebUtilities;
using System.Linq;

namespace IdentityServerWithIdentitySQLite
{
    public class LocalizationQueryProvider : RequestCultureProvider
    {
        public static readonly string DefaultParamterName = "culture";

        public string QureyParamterName { get; set; } = DefaultParamterName;

        /// <inheritdoc />
        public override Task<ProviderCultureResult> DetermineProviderCultureResult(HttpContext httpContext)
        {
            if (httpContext == null)
            {
                throw new ArgumentNullException(nameof(httpContext));
            }

            var query = httpContext.Request.Query;
            var exists = query.TryGetValue("ui_locales", out StringValues culture);

            if (!exists)
            {
                exists = query.TryGetValue("returnUrl", out StringValues requesturl);
                // hack because Identityserver4 does some magic here...
                // Need to set the culture manually
                if (exists)
                {
                    var request = requesturl.ToArray()[0];
                    Uri uri = new Uri("http://faketopreventexception" + request);
                    var query1 = QueryHelpers.ParseQuery(uri.Query);
                    var requestCulture = query1.FirstOrDefault(t => t.Key == "ui_locales").Value;

                    var cultureFromReturnUrl = requestCulture.ToString();
                    if(string.IsNullOrEmpty(cultureFromReturnUrl))
                    {
                        return NullProviderCultureResult;
                    }

                    culture = cultureFromReturnUrl;
                }
            }

            var providerResultCulture = ParseDefaultParamterValue(culture);

            // Use this cookie for following requests, so that for example the logout request will work
            if (!string.IsNullOrEmpty(culture.ToString()))
            {
                var cookie = httpContext.Request.Cookies[".AspNetCore.Culture"];
                var newCookieValue = CookieRequestCultureProvider.MakeCookieValue(new RequestCulture(culture));

                if (string.IsNullOrEmpty(cookie) || cookie != newCookieValue)
                {
                    httpContext.Response.Cookies.Append(".AspNetCore.Culture", newCookieValue);
                }
            }

            return Task.FromResult(providerResultCulture);
        }

        public static ProviderCultureResult ParseDefaultParamterValue(string value)
        {
            if (string.IsNullOrWhiteSpace(value))
            {
                return null;
            }

            var cultureName = value;
            var uiCultureName = value;

            if (cultureName == null && uiCultureName == null)
            {
                // No values specified for either so no match
                return null;
            }

            if (cultureName != null && uiCultureName == null)
            {
                uiCultureName = cultureName;
            }

            if (cultureName == null && uiCultureName != null)
            {
                cultureName = uiCultureName;
            }

            return new ProviderCultureResult(cultureName, uiCultureName);
        }
    }
}

The LocalizationQueryProvider can then be added as part of the localization configuration.

services.Configure<RequestLocalizationOptions>(
options =>
{
	var supportedCultures = new List<CultureInfo>
		{
			new CultureInfo("en-US"),
			new CultureInfo("de-CH"),
			new CultureInfo("fr-CH"),
			new CultureInfo("it-CH")
		};

	options.DefaultRequestCulture = new RequestCulture(culture: "de-CH", uiCulture: "de-CH");
	options.SupportedCultures = supportedCultures;
	options.SupportedUICultures = supportedCultures;

	var providerQuery = new LocalizationQueryProvider
	{
		QureyParamterName = "ui_locales"
	};

	options.RequestCultureProviders.Insert(0, providerQuery);
});

The client application can add the ui_locales parameter to the authorize request.

let culture = 'de-CH';
if (this.locale.getCurrentCountry()) {
   culture = this.locale.getCurrentLanguage() + '-' + this.locale.getCurrentCountry();
}

this.oidcSecurityService.setCustomRequestParameters({ 'ui_locales': culture});

this.oidcSecurityService.authorize();

The localization will now be sent from the client application to the server.

https://localhost:44318/account/login?returnUrl=%2Fconnect%2Fauthorize? …ui_locales%3Dfr-CH


Links:

https://damienbod.com/2017/11/01/shared-localization-in-asp-net-core-mvc/

https://github.com/IdentityServer/IdentityServer4

https://docs.microsoft.com/en-us/aspnet/core/fundamentals/localization

https://github.com/robisim74/angular-l10n

https://damienbod.com/2017/11/06/identityserver4-localization-with-the-oidc-implicit-flow/

http://openid.net/specs/openid-connect-core-1_0.html

Sending Direct Messages using SignalR with ASP.NET core and Angular

$
0
0

This article should how SignalR could be used to send direct messages between different clients using ASP.NET Core to host the SignalR Hub and Angular to implement the clients.

Code: https://github.com/damienbod/AspNetCoreAngularSignalRSecurity

Other posts in this series:

When the application is started, different clients can log in using an email, if already registered, and can send direct messages from one SignalR client to the other SignalR client using the email of the user which was used to sign in. All messages are sent using a JWT token which is used to validate the identity.

The latest Microsoft.AspNetCore.SignalR Nuget package can be added to the ASP.NET Core project in the csproj file, or by using the Visual Studio Nuget package manager to add the package.

<PackageReference Include="Microsoft.AspNetCore.SignalR" Version="1.0.0-alpha2-final" />

A single SignalR Hub is used to add the logic to send the direct messages between the clients. The Hub is protected using the bearer token authentication scheme which is defined in the Authorize filter. A client can leave or join using the Context.User.Identity.Name, which is configured to use the email of the Identity. When the user joins, the connectionId is saved to the in-memory database, which can then be used to send the direct messages. All other online clients are sent a message, with the new user data. The actual client is sent the complete list of existing clients.

using Microsoft.AspNetCore.Authorization;
using Microsoft.AspNetCore.SignalR;
using System.Collections.Generic;
using System.Linq;
using System.Threading.Tasks;

namespace ApiServer.SignalRHubs
{
    [Authorize(AuthenticationSchemes = "Bearer")]
    public class UsersDmHub : Hub
    {
        private UserInfoInMemory _userInfoInMemory;

        public UsersDmHub(UserInfoInMemory userInfoInMemory)
        {
            _userInfoInMemory = userInfoInMemory;
        }

        public async Task Leave()
        {
            _userInfoInMemory.Remove(Context.User.Identity.Name);
            await Clients.AllExcept(new List<string> { Context.ConnectionId }).InvokeAsync(
                   "UserLeft",
                   Context.User.Identity.Name
                   );
        }

        public async Task Join()
        {
            if (!_userInfoInMemory.AddUpdate(Context.User.Identity.Name, Context.ConnectionId))
            {
                // new user

                var list = _userInfoInMemory.GetAllUsersExceptThis(Context.User.Identity.Name).ToList();
                await Clients.AllExcept(new List<string> { Context.ConnectionId }).InvokeAsync(
                    "NewOnlineUser",
                    _userInfoInMemory.GetUserInfo(Context.User.Identity.Name)
                    );
            }
            else
            {
                // existing user joined again
                
            }

            await Clients.Client(Context.ConnectionId).InvokeAsync(
                "Joined",
                _userInfoInMemory.GetUserInfo(Context.User.Identity.Name)
                );

            await Clients.Client(Context.ConnectionId).InvokeAsync(
                "OnlineUsers",
                _userInfoInMemory.GetAllUsersExceptThis(Context.User.Identity.Name)
            );
        }

        public Task SendDirectMessage(string message, string targetUserName)
        {
            var userInfoSender = _userInfoInMemory.GetUserInfo(Context.User.Identity.Name);
            var userInfoReciever = _userInfoInMemory.GetUserInfo(targetUserName);
            return Clients.Client(userInfoReciever.ConnectionId).InvokeAsync("SendDM", message, userInfoSender);
        }
    }
}

The UserInfoInMemory is used as an in-memory database, which is nothing more than a ConcurrentDictionary to manage the online users.

System.Collections.Concurrent;
using System.Collections.Generic;
using System.Linq;

namespace ApiServer.SignalRHubs
{
    public class UserInfoInMemory
    {
        private ConcurrentDictionary<string, UserInfo> _onlineUser { get; set; } = new ConcurrentDictionary<string, UserInfo>();

        public bool AddUpdate(string name, string connectionId)
        {
            var userAlreadyExists = _onlineUser.ContainsKey(name);

            var userInfo = new UserInfo
            {
                UserName = name,
                ConnectionId = connectionId
            };

            _onlineUser.AddOrUpdate(name, userInfo, (key, value) => userInfo);

            return userAlreadyExists;
        }

        public void Remove(string name)
        {
            UserInfo userInfo;
            _onlineUser.TryRemove(name, out userInfo);
        }

        public IEnumerable<UserInfo> GetAllUsersExceptThis(string username)
        {
            return _onlineUser.Values.Where(item => item.UserName != username);
        }

        public UserInfo GetUserInfo(string username)
        {
            UserInfo user;
            _onlineUser.TryGetValue(username, out user);
            return user;
        }
    }
}

The UserInfo class is used to save the ConnectionId from the SignalR Hub, and the user name.

namespace ApiServer.SignalRHubs
{
    public class UserInfo
    {
        public string ConnectionId { get; set; }
        public string UserName { get; set; }
    }
}

The JWT Bearer token is configured in the startup class, to read the token from the URL parameters.

var tokenValidationParameters = new TokenValidationParameters()
{
	ValidIssuer = "https://localhost:44318/",
	ValidAudience = "dataEventRecords",
	IssuerSigningKey = new SymmetricSecurityKey(Encoding.UTF8.GetBytes("dataEventRecordsSecret")),
	NameClaimType = "name",
	RoleClaimType = "role", 
};

var jwtSecurityTokenHandler = new JwtSecurityTokenHandler
{
	InboundClaimTypeMap = new Dictionary<string, string>()
};

services.AddAuthentication(IdentityServerAuthenticationDefaults.AuthenticationScheme)
.AddJwtBearer(options =>
{
	options.Authority = "https://localhost:44318/";
	options.Audience = "dataEventRecords";
	options.IncludeErrorDetails = true;
	options.SaveToken = true;
	options.SecurityTokenValidators.Clear();
	options.SecurityTokenValidators.Add(jwtSecurityTokenHandler);
	options.TokenValidationParameters = tokenValidationParameters;
	options.Events = new JwtBearerEvents
	{
		OnMessageReceived = context =>
		{
			if ( (context.Request.Path.Value.StartsWith("/loo")) || (context.Request.Path.Value.StartsWith("/usersdm")) 
				&& context.Request.Query.TryGetValue("token", out StringValues token)
			)
			{
				context.Token = token;
			}

			return Task.CompletedTask;
		},
		OnAuthenticationFailed = context =>
		{
			var te = context.Exception;
			return Task.CompletedTask;
		}
	};
});

Angular SignalR Client

The Angular SignalR client is implemented using the npm package “@aspnet/signalr-client”: “1.0.0-alpha2-final”

A ngrx store is used to manage the states sent, received from the API. All SiganlR messages are sent using the DirectMessagesService Angular service. This service is called from the ngrx effects, or sends the received information to the reducer of the ngrx store.

import 'rxjs/add/operator/map';
import { Subscription } from 'rxjs/Subscription';

import { HttpHeaders } from '@angular/common/http';
import { Injectable } from '@angular/core';

import { HubConnection } from '@aspnet/signalr-client';
import { Store } from '@ngrx/store';
import * as directMessagesActions from './store/directmessages.action';
import { OidcSecurityService } from 'angular-auth-oidc-client';
import { OnlineUser } from './models/online-user';

@Injectable()
export class DirectMessagesService {

    private _hubConnection: HubConnection;
    private headers: HttpHeaders;

    isAuthorizedSubscription: Subscription;
    isAuthorized: boolean;

    constructor(
        private store: Store<any>,
        private oidcSecurityService: OidcSecurityService
    ) {
        this.headers = new HttpHeaders();
        this.headers = this.headers.set('Content-Type', 'application/json');
        this.headers = this.headers.set('Accept', 'application/json');

        this.init();
    }

    sendDirectMessage(message: string, userId: string): string {

        this._hubConnection.invoke('SendDirectMessage', message, userId);
        return message;
    }

    leave(): void {
        this._hubConnection.invoke('Leave');
    }

    join(): void {
        this._hubConnection.invoke('Join');
    }

    private init() {
        this.isAuthorizedSubscription = this.oidcSecurityService.getIsAuthorized().subscribe(
            (isAuthorized: boolean) => {
                this.isAuthorized = isAuthorized;
                if (this.isAuthorized) {
                    this.initHub();
                }
            });
        console.log('IsAuthorized:' + this.isAuthorized);
    }

    private initHub() {
        console.log('initHub');
        const token = this.oidcSecurityService.getToken();
        let tokenValue = '';
        if (token !== '') {
            tokenValue = '?token=' + token;
        }
        const url = 'https://localhost:44390/';
        this._hubConnection = new HubConnection(`${url}usersdm${tokenValue}`);

        this._hubConnection.on('NewOnlineUser', (onlineUser: OnlineUser) => {
            console.log('NewOnlineUser received');
            console.log(onlineUser);
            this.store.dispatch(new directMessagesActions.ReceivedNewOnlineUser(onlineUser));
        });

        this._hubConnection.on('OnlineUsers', (onlineUsers: OnlineUser[]) => {
            console.log('OnlineUsers received');
            console.log(onlineUsers);
            this.store.dispatch(new directMessagesActions.ReceivedOnlineUsers(onlineUsers));
        });

        this._hubConnection.on('Joined', (onlineUser: OnlineUser) => {
            console.log('Joined received');
            this.store.dispatch(new directMessagesActions.JoinSent());
            console.log(onlineUser);
        });

        this._hubConnection.on('SendDM', (message: string, onlineUser: OnlineUser) => {
            console.log('SendDM received');
            this.store.dispatch(new directMessagesActions.ReceivedDirectMessage(message, onlineUser));
        });

        this._hubConnection.on('UserLeft', (name: string) => {
            console.log('UserLeft received');
            this.store.dispatch(new directMessagesActions.ReceivedUserLeft(name));
        });

        this._hubConnection.start()
            .then(() => {
                console.log('Hub connection started')
                this._hubConnection.invoke('Join');
            })
            .catch(() => {
                console.log('Error while establishing connection')
            });
    }

}

The DirectMessagesComponent is used to display the data, or send the events to the ngrx store, which in turn, sends the data to the SignalR server.

import { Component, OnInit, OnDestroy } from '@angular/core';
import { Subscription } from 'rxjs/Subscription';
import { Store } from '@ngrx/store';
import { DirectMessagesState } from '../store/directmessages.state';
import * as directMessagesAction from '../store/directmessages.action';
import { OidcSecurityService } from 'angular-auth-oidc-client';
import { OnlineUser } from '../models/online-user';
import { DirectMessage } from '../models/direct-message';
import { Observable } from 'rxjs/Observable';

@Component({
    selector: 'app-direct-message-component',
    templateUrl: './direct-message.component.html'
})

export class DirectMessagesComponent implements OnInit, OnDestroy {
    public async: any;
    onlineUsers: OnlineUser[];
    onlineUser: OnlineUser;
    directMessages: DirectMessage[];
    selectedOnlineUserName = '';
    dmState$: Observable<DirectMessagesState>;
    dmStateSubscription: Subscription;
    isAuthorizedSubscription: Subscription;
    isAuthorized: boolean;
    connected: boolean;
    message = '';

    constructor(
        private store: Store<any>,
        private oidcSecurityService: OidcSecurityService
    ) {
        this.dmState$ = this.store.select<DirectMessagesState>(state => state.dm.dm);
        this.dmStateSubscription = this.store.select<DirectMessagesState>(state => state.dm.dm)
            .subscribe((o: DirectMessagesState) => {
                this.connected = o.connected;
            });

    }

    public sendDm(): void {
        this.store.dispatch(new directMessagesAction.SendDirectMessageAction(this.message, this.onlineUser.userName));
    }

    ngOnInit() {
        this.isAuthorizedSubscription = this.oidcSecurityService.getIsAuthorized().subscribe(
            (isAuthorized: boolean) => {
                this.isAuthorized = isAuthorized;
                if (this.isAuthorized) {
                }
            });
        console.log('IsAuthorized:' + this.isAuthorized);
    }

    ngOnDestroy(): void {
        this.isAuthorizedSubscription.unsubscribe();
        this.dmStateSubscription.unsubscribe();
    }

    selectChat(onlineuserUserName: string): void {
        this.selectedOnlineUserName = onlineuserUserName
    }

    sendMessage() {
        console.log('send message to:' + this.selectedOnlineUserName + ':' + this.message);
        this.store.dispatch(new directMessagesAction.SendDirectMessageAction(this.message, this.selectedOnlineUserName));
    }

    getUserInfoName(directMessage: DirectMessage) {
        if (directMessage.fromOnlineUser) {
            return directMessage.fromOnlineUser.userName;
        }

        return '';
    }

    disconnect() {
        this.store.dispatch(new directMessagesAction.Leave());
    }

    connect() {
        this.store.dispatch(new directMessagesAction.Join());
    }
}

The Angular HTML template displays the data using Angular material.

<div class="full-width" *ngIf="isAuthorized">
    <div class="left-navigation-container" >
        <nav>

            <mat-list>
                <mat-list-item *ngFor="let onlineuser of (dmState$|async)?.onlineUsers">
                    <a mat-button (click)="selectChat(onlineuser.userName)">{{onlineuser.userName}}</a>
                </mat-list-item>
            </mat-list>

        </nav>
    </div>
    <div class="column-container content-container">
        <div class="row-container info-bar">
            <h3 style="padding-left: 20px;">{{selectedOnlineUserName}}</h3>
            <a mat-button (click)="sendMessage()" *ngIf="connected && selectedOnlineUserName && selectedOnlineUserName !=='' && message !==''">SEND</a>
            <a mat-button (click)="disconnect()" *ngIf="connected">Disconnect</a>
            <a mat-button (click)="connect()" *ngIf="!connected">Connect</a>
        </div>

        <div class="content" *ngIf="selectedOnlineUserName && selectedOnlineUserName !==''">

            <mat-form-field  style="width:95%">
                <textarea matInput placeholder="your message" [(ngModel)]="message" matTextareaAutosize matAutosizeMinRows="2"
                          matAutosizeMaxRows="5"></textarea>
            </mat-form-field>
           
            <mat-chip-list class="mat-chip-list-stacked">
                <ng-container *ngFor="let directMessage of (dmState$|async)?.directMessages">

                    <ng-container *ngIf="getUserInfoName(directMessage) !== ''">
                        <mat-chip selected="true" style="width:95%">
                            {{getUserInfoName(directMessage)}} {{directMessage.message}}
                        </mat-chip>
                    </ng-container>
                       
                    <ng-container *ngIf="getUserInfoName(directMessage) === ''">
                        <mat-chip style="width:95%">
                            {{getUserInfoName(directMessage)}} {{directMessage.message}}
                        </mat-chip>
                    </ng-container>

                    </ng-container>
            </mat-chip-list>

        </div>
    </div>
</div>

Links

https://github.com/aspnet/SignalR

https://github.com/aspnet/SignalR#readme

https://github.com/ngrx

https://www.npmjs.com/package/@aspnet/signalr-client

https://dotnet.myget.org/F/aspnetcore-ci-dev/api/v3/index.json

https://dotnet.myget.org/F/aspnetcore-ci-dev/npm/

https://dotnet.myget.org/feed/aspnetcore-ci-dev/package/npm/@aspnet/signalr-client

https://www.npmjs.com/package/msgpack5

Using an EF Core database for the IdentityServer4 configuration data

$
0
0

This article shows how to implement a database store for the IdentityServer4 configurations for the Client, ApiResource and IdentityResource settings using Entity Framework Core and SQLite. This could be used, if you need to create clients, or resources dynamically for the STS, or if you need to deploy the STS to multiple instances, for example using Service Fabric. To make it scalable, you need to remove all session data, and configuration data from the STS instances and share this in a shared resource, otherwise you can run it only smoothly as a single instance.

Information about IdentityServer4 deployment can be found here:
http://docs.identityserver.io/en/release/topics/deployment.html

Code: https://github.com/damienbod/AspNetCoreIdentityServer4Persistence

Implementing the IClientStore

By implementing the IClientStore, you can load your STS client data from anywhere you want. This example uses an Entity Framework Core Context, to load the data from a SQLite database.

using IdentityServer4.Models;
using IdentityServer4.Stores;
using Microsoft.Extensions.Logging;
using System;
using System.Linq;
using System.Threading.Tasks;

namespace AspNetCoreIdentityServer4Persistence.ConfigurationStore
{
    public class ClientStore : IClientStore
    {
        private readonly ConfigurationStoreContext _context;
        private readonly ILogger _logger;

        public ClientStore(ConfigurationStoreContext context, ILoggerFactory loggerFactory)
        {
            _context = context;
            _logger = loggerFactory.CreateLogger("ClientStore");
        }

        public Task<Client> FindClientByIdAsync(string clientId)
        {
            var client = _context.Clients.First(t => t.ClientId == clientId);
            client.MapDataFromEntity();
            return Task.FromResult(client.Client);
        }
    }
}

The ClientEntity is used to save or retrieve the data from the database. Because the IdentityServer4 class cannot be saved directly using Entity Framework Core, a wrapper class is used which saves the Client object as a Json string. The entity class implements helper methods, which parses the Json string to/from the type Client class, which is used by Identityserver4.

using IdentityServer4.Models;
using Newtonsoft.Json;
using System;
using System.Collections.Generic;
using System.ComponentModel.DataAnnotations;
using System.ComponentModel.DataAnnotations.Schema;
using System.Linq;
using System.Threading.Tasks;

namespace AspNetCoreIdentityServer4Persistence.ConfigurationStore
{
    public class ClientEntity
    {
        public string ClientData { get; set; }

        [Key]
        public string ClientId { get; set; }

        [NotMapped]
        public Client Client { get; set; }

        public void AddDataToEntity()
        {
            ClientData = JsonConvert.SerializeObject(Client);
            ClientId = Client.ClientId;
        }

        public void MapDataFromEntity()
        {
            Client = JsonConvert.DeserializeObject<Client>(ClientData);
            ClientId = Client.ClientId;
        }
    }
}

Teh ConfigurationStoreContext implements the Entity Framework class to access the SQLite database. This could be easily changed to any other database supported by Entity Framework Core.

using IdentityServer4.Models;
using Microsoft.EntityFrameworkCore;

namespace AspNetCoreIdentityServer4Persistence.ConfigurationStore
{
    public class ConfigurationStoreContext : DbContext
    {
        public ConfigurationStoreContext(DbContextOptions<ConfigurationStoreContext> options) : base(options)
        { }

        public DbSet<ClientEntity> Clients { get; set; }
        public DbSet<ApiResourceEntity> ApiResources { get; set; }
        public DbSet<IdentityResourceEntity> IdentityResources { get; set; }
        

        protected override void OnModelCreating(ModelBuilder builder)
        {
            builder.Entity<ClientEntity>().HasKey(m => m.ClientId);
            builder.Entity<ApiResourceEntity>().HasKey(m => m.ApiResourceName);
            builder.Entity<IdentityResourceEntity>().HasKey(m => m.IdentityResourceName);
            base.OnModelCreating(builder);
        }
    }
}

Implementing the IResourceStore

The IResourceStore interface is used to save or access the ApiResource configurations and the IdentityResource data in the IdentityServer4 application. This is implemented in a similiar way to the IClientStore.

using IdentityServer4.Models;
using IdentityServer4.Stores;
using Microsoft.Extensions.Logging;
using System;
using System.Collections.Generic;
using System.Linq;
using System.Threading.Tasks;

namespace AspNetCoreIdentityServer4Persistence.ConfigurationStore
{
    public class ResourceStore : IResourceStore
    {
        private readonly ConfigurationStoreContext _context;
        private readonly ILogger _logger;

        public ResourceStore(ConfigurationStoreContext context, ILoggerFactory loggerFactory)
        {
            _context = context;
            _logger = loggerFactory.CreateLogger("ResourceStore");
        }

        public Task<ApiResource> FindApiResourceAsync(string name)
        {
            var apiResource = _context.ApiResources.First(t => t.ApiResourceName == name);
            apiResource.MapDataFromEntity();
            return Task.FromResult(apiResource.ApiResource);
        }

        public Task<IEnumerable<ApiResource>> FindApiResourcesByScopeAsync(IEnumerable<string> scopeNames)
        {
            if (scopeNames == null) throw new ArgumentNullException(nameof(scopeNames));


            var apiResources = new List<ApiResource>();
            var apiResourcesEntities = from i in _context.ApiResources
                                            where scopeNames.Contains(i.ApiResourceName)
                                            select i;

            foreach (var apiResourceEntity in apiResourcesEntities)
            {
                apiResourceEntity.MapDataFromEntity();

                apiResources.Add(apiResourceEntity.ApiResource);
            }

            return Task.FromResult(apiResources.AsEnumerable());
        }

        public Task<IEnumerable<IdentityResource>> FindIdentityResourcesByScopeAsync(IEnumerable<string> scopeNames)
        {
            if (scopeNames == null) throw new ArgumentNullException(nameof(scopeNames));

            var identityResources = new List<IdentityResource>();
            var identityResourcesEntities = from i in _context.IdentityResources
                             where scopeNames.Contains(i.IdentityResourceName)
                           select i;

            foreach (var identityResourceEntity in identityResourcesEntities)
            {
                identityResourceEntity.MapDataFromEntity();

                identityResources.Add(identityResourceEntity.IdentityResource);
            }

            return Task.FromResult(identityResources.AsEnumerable());
        }

        public Task<Resources> GetAllResourcesAsync()
        {
            var apiResourcesEntities = _context.ApiResources.ToList();
            var identityResourcesEntities = _context.IdentityResources.ToList();

            var apiResources = new List<ApiResource>();
            var identityResources= new List<IdentityResource>();

            foreach (var apiResourceEntity in apiResourcesEntities)
            {
                apiResourceEntity.MapDataFromEntity();

                apiResources.Add(apiResourceEntity.ApiResource);
            }

            foreach (var identityResourceEntity in identityResourcesEntities)
            {
                identityResourceEntity.MapDataFromEntity();

                identityResources.Add(identityResourceEntity.IdentityResource);
            }

            var result = new Resources(identityResources, apiResources);
            return Task.FromResult(result);
        }
    }
}

The IdentityResourceEntity class is used to persist the IdentityResource data.

using IdentityServer4.Models;
using Newtonsoft.Json;
using System;
using System.Collections.Generic;
using System.ComponentModel.DataAnnotations;
using System.ComponentModel.DataAnnotations.Schema;
using System.Linq;
using System.Threading.Tasks;

namespace AspNetCoreIdentityServer4Persistence.ConfigurationStore
{
    public class IdentityResourceEntity
    {
        public string IdentityResourceData { get; set; }

        [Key]
        public string IdentityResourceName { get; set; }

        [NotMapped]
        public IdentityResource IdentityResource { get; set; }

        public void AddDataToEntity()
        {
            IdentityResourceData = JsonConvert.SerializeObject(IdentityResource);
            IdentityResourceName = IdentityResource.Name;
        }

        public void MapDataFromEntity()
        {
            IdentityResource = JsonConvert.DeserializeObject<IdentityResource>(IdentityResourceData);
            IdentityResourceName = IdentityResource.Name;
        }
    }
}

The ApiResourceEntity is used to persist the ApiResource data.

using IdentityServer4.Models;
using Newtonsoft.Json;
using System;
using System.Collections.Generic;
using System.ComponentModel.DataAnnotations;
using System.ComponentModel.DataAnnotations.Schema;
using System.Linq;
using System.Threading.Tasks;

namespace AspNetCoreIdentityServer4Persistence.ConfigurationStore
{
    public class ApiResourceEntity
    {
        public string ApiResourceData { get; set; }

        [Key]
        public string ApiResourceName { get; set; }

        [NotMapped]
        public ApiResource ApiResource { get; set; }

        public void AddDataToEntity()
        {
            ApiResourceData = JsonConvert.SerializeObject(ApiResource);
            ApiResourceName = ApiResource.Name;
        }

        public void MapDataFromEntity()
        {
            ApiResource = JsonConvert.DeserializeObject<ApiResource>(ApiResourceData);
            ApiResourceName = ApiResource.Name;
        }
    }
}

Adding the stores to the IdentityServer4 MVC startup class

The created stores can now be used and added to the Startup class of the ASP.NET Core MVC host project for IdentityServer4. The AddDbContext method is used to setup the Entity Framework Core data access and the AddResourceStore as well as AddClientStore are used to add the configuration data to IdentityServer4. The two interfaces and also the implementations need to be registered with the IoC.

The default AddInMemory… extension methods are removed.

public void ConfigureServices(IServiceCollection services)
{
	services.AddDbContext<ConfigurationStoreContext>(options =>
		options.UseSqlite(
			Configuration.GetConnectionString("ConfigurationStoreConnection"),
			b => b.MigrationsAssembly("AspNetCoreIdentityServer4")
		)
	);

	...

	services.AddTransient<IClientStore, ClientStore>();
	services.AddTransient<IResourceStore, ResourceStore>();

	services.AddIdentityServer()
		.AddSigningCredential(cert)
		.AddResourceStore<ResourceStore>()
		.AddClientStore<ClientStore>()
		.AddAspNetIdentity<ApplicationUser>()
		.AddProfileService<IdentityWithAdditionalClaimsProfileService>();

}

Seeding the database

A simple .NET Core console application is used to seed the STS server with data. This class creates the different Client, ApiResources and IdentityResources as required. The data is added directly to the database using Entity Framework Core. If this was a micro service, you would implement an API on the STS server which adds, removes, updates the data as required.

static void Main(string[] args)
{
	try
	{
		var currentDirectory = Directory.GetCurrentDirectory();

		var configuration = new ConfigurationBuilder()
			.AddJsonFile($"{currentDirectory}\\..\\AspNetCoreIdentityServer4\\appsettings.json")
			.Build();

		var configurationStoreConnection = configuration.GetConnectionString("ConfigurationStoreConnection");

		var optionsBuilder = new DbContextOptionsBuilder<ConfigurationStoreContext>();
		optionsBuilder.UseSqlite(configurationStoreConnection);

		using (var configurationStoreContext = new ConfigurationStoreContext(optionsBuilder.Options))
		{
			configurationStoreContext.AddRange(Config.GetClients());
			configurationStoreContext.AddRange(Config.GetIdentityResources());
			configurationStoreContext.AddRange(Config.GetApiResources());
			configurationStoreContext.SaveChanges();
		}
	}
	catch (Exception e)
	{
		Console.WriteLine(e.Message);
	}

	Console.ReadLine();
}

The static Config class just adds the data like the IdentityServer4 examples.


Now the applications run using the configuration data stored in an Entity Framwork Core supported database.

Note:

This post shows how just the configuration data can be setup for IdentityServer4. To make it scale, you also need to implement the IPersistedGrantStore and CORS for each client in the database. A cache solution might also be required.

IdentityServer4 provides a full solution and example: IdentityServer4.EntityFramework

Links:

http://docs.identityserver.io/en/release/topics/deployment.html

https://damienbod.com/2016/01/07/experiments-with-entity-framework-7-and-asp-net-5-mvc-6/

https://docs.microsoft.com/en-us/ef/core/get-started/netcore/new-db-sqlite

https://docs.microsoft.com/en-us/ef/core/

http://docs.identityserver.io/en/release/reference/ef.html

https://github.com/IdentityServer/IdentityServer4.EntityFramework

https://elanderson.net/2017/07/identity-server-using-entity-framework-core-for-configuration-data/

http://docs.identityserver.io/en/release/quickstarts/8_entity_framework.html

Creating specific themes for OIDC clients using razor views with IdentityServer4

$
0
0

This post shows how to use specific themes in an ASPNET Core STS application using IdentityServer4. For each OpenId Connect (OIDC) client, a separate theme is used. The theme is implemented using Razor, based on the examples, code from Ben Foster. Thanks for these. The themes can then be customized as required.

Code: https://github.com/damienbod/AspNetCoreIdentityServer4Persistence

Setup

The applications are setup using 2 OIDC Implicit Flow clients which get the tokens and login using a single IdentityServer4 application. The client id is sent which each authorize request. The client id is used to select, switch the theme.

An instance of the ClientSelector class is used per request to set, save the selected client id. The class is registered as a scoped instance.

namespace IdentityServerWithIdentitySQLite
{
    public class ClientSelector
    {
        public string SelectedClient = "";
    }
}

The ClientIdFilter Action Filter is used to read the client id from the authorize request and saves this to the ClientSelector instance of the request. The client id is read from the requesturl parameter.

using System;
using Microsoft.Extensions.Primitives;
using Microsoft.AspNetCore.WebUtilities;
using System.Linq;
using Microsoft.AspNetCore.Mvc.Filters;

namespace IdentityServerWithIdentitySQLite
{
    public class ClientIdFilter : IActionFilter
    {
        public ClientIdFilter(ClientSelector clientSelector)
        {
            _clientSelector = clientSelector;
        }

        public string Client_id = "none";
        private readonly ClientSelector _clientSelector;

        public void OnActionExecuted(ActionExecutedContext context)
        {
            var query = context.HttpContext.Request.Query;
            var exists = query.TryGetValue("client_id", out StringValues culture);

            if (!exists)
            {
                exists = query.TryGetValue("returnUrl", out StringValues requesturl);

                if (exists)
                {
                    var request = requesturl.ToArray()[0];
                    Uri uri = new Uri("http://faketopreventexception" + request);
                    var query1 = QueryHelpers.ParseQuery(uri.Query);
                    var client_id = query1.FirstOrDefault(t => t.Key == "client_id").Value;

                    _clientSelector.SelectedClient = client_id.ToString();
                }
            }
        }

        public void OnActionExecuting(ActionExecutingContext context)
        {
            
        }
    }
}

Now that we have a ClientSelector instance which can be injected into the different views as required, we also want to use different razor templates for each theme.

The IViewLocationExpander interface is implemented and sets the locations for the different themes. For a request, the client_id is read from the authorize request. For a logout, the client_id is not available in the URL. The selectedClient is set in the logout action method, and this can be read then when rendering the views.

using Microsoft.AspNetCore.Mvc.Razor;
using Microsoft.AspNetCore.WebUtilities;
using Microsoft.Extensions.Primitives;
using System;
using System.Collections.Generic;
using System.Linq;

public class ClientViewLocationExpander : IViewLocationExpander
{
    private const string THEME_KEY = "theme";

    public void PopulateValues(ViewLocationExpanderContext context)
    {
        var query = context.ActionContext.HttpContext.Request.Query;
        var exists = query.TryGetValue("client_id", out StringValues culture);

        if (!exists)
        {
            exists = query.TryGetValue("returnUrl", out StringValues requesturl);

            if (exists)
            {
                var request = requesturl.ToArray()[0];
                Uri uri = new Uri("http://faketopreventexception" + request);
                var query1 = QueryHelpers.ParseQuery(uri.Query);
                var client_id = query1.FirstOrDefault(t => t.Key == "client_id").Value;

                context.Values[THEME_KEY] = client_id.ToString();
            }
        }
    }

    public IEnumerable<string> ExpandViewLocations(ViewLocationExpanderContext context, IEnumerable<string> viewLocations)
    {
        // add the themes to the view location if one of the theme layouts are required. 
        if (context.ViewName.Contains("_Layout") 
            && context.ActionContext.HttpContext.Request.Path.ToString().Contains("logout"))
        {
            string themeValue = context.ViewName.Replace("_Layout", "");
            context.Values[THEME_KEY] = themeValue;
        }

        string theme = null;
        if (context.Values.TryGetValue(THEME_KEY, out theme))
        {
            viewLocations = new[] {
                $"/Themes/{theme}/{{1}}/{{0}}.cshtml",
                $"/Themes/{theme}/Shared/{{0}}.cshtml",
            }
            .Concat(viewLocations);
        }

        return viewLocations;
    }
}

The logout method in the account controller sets the theme and opens the correct themed view.

public async Task<IActionResult> Logout(LogoutViewModel model)
{
	...
	
	// get context information (client name, post logout redirect URI and iframe for federated signout)
	var logout = await _interaction.GetLogoutContextAsync(model.LogoutId);

	var vm = new LoggedOutViewModel
	{
		PostLogoutRedirectUri = logout?.PostLogoutRedirectUri,
		ClientName = logout?.ClientId,
		SignOutIframeUrl = logout?.SignOutIFrameUrl
	};
	_clientSelector.SelectedClient = logout?.ClientId;
	await _persistedGrantService.RemoveAllGrantsAsync(subjectId, logout?.ClientId);
	return View($"~/Themes/{logout?.ClientId}/Account/LoggedOut.cshtml", vm);
}

In the startup class, the classes are registered with the IoC, and the ClientViewLocationExpander is added.

public void ConfigureServices(IServiceCollection services)
{
	...
	
	services.AddScoped<ClientIdFilter>();
	services.AddScoped<ClientSelector>();
	services.AddAuthentication();

	services.Configure<RazorViewEngineOptions>(options =>
	{
		options.ViewLocationExpanders.Add(new ClientViewLocationExpander());
	});

In the Views folder, all the default views are implemented like before. The _ViewStart.cshtml was changed to select the correct layout using the injected service _clientSelector.

@using System.Globalization
@using IdentityServerWithAspNetIdentity.Resources
@inject LocService SharedLocalizer
@inject IdentityServerWithIdentitySQLite.ClientSelector _clientSelector
@{
    Layout = $"_Layout{_clientSelector.SelectedClient}";
}

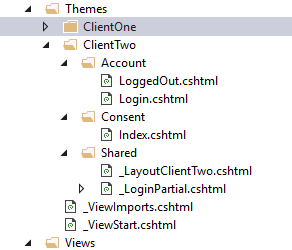
Then the layout from the corresponding theme for the client is used and can be styled, changed as required for each client. Each themed Razor template which uses other views, should call the themed view. For example the ClientOne theme _Layout Razor view uses the _LoginPartial themed cshtml and not the default one.

@await Html.PartialAsync("~/Themes/ClientOne/Shared/_LoginPartial.cshtml")

The required themed views can then be implemented as required.

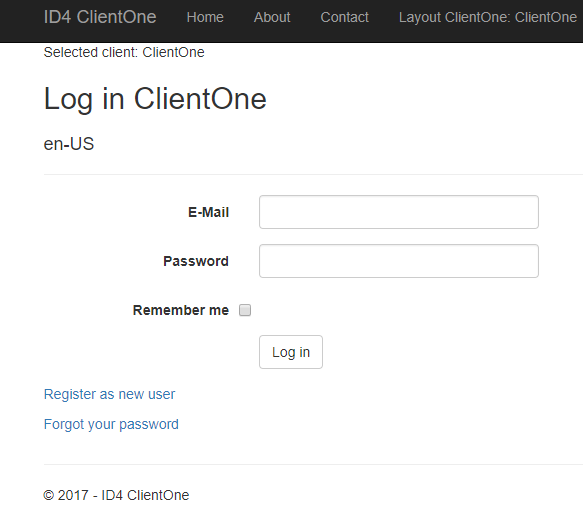
Client One themed view:

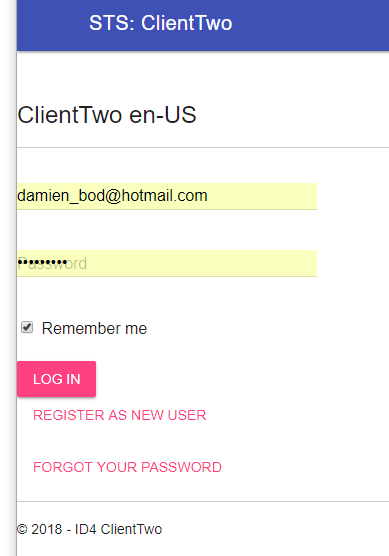
Client Two themed view:

Logout themed view for Client Two:

Links:

http://benfoster.io/blog/asp-net-core-themes-and-multi-tenancy

http://docs.identityserver.io/en/release/

https://docs.microsoft.com/en-us/ef/core/

https://docs.microsoft.com/en-us/aspnet/core/

https://getmdl.io/started/

Using the dotnet Angular template with Azure AD OIDC Implicit Flow

$
0
0

This article shows how to use Azure AD with an Angular application implemented using the Microsoft dotnet template and the angular-auth-oidc-client npm package to implement the OpenID Implicit Flow. The Angular app uses bootstrap 4 and Angular CLI.

Code: https://github.com/damienbod/dotnet-template-angular

Setting up Azure AD

Log into https://portal.azure.com and click the Azure Active Directory button

Click App registrations and then the New application registration

Add an application name and set the URL to match the application URL. Click the create button.

Open the new application.

Click the Manifest button.

Set the oauth2AllowImplicitFlow to true.

Click the settings button and add the API Access required permissions as needed.

Now the Azure AD is ready to go. You will need to add your users which you want to login with and add them as admins if required. For example, I have add damien@damienbod.onmicrosoft.com as an owner.

dotnet Angular template from Microsoft.

Install the latest version and create a new project.

Installation:
https://docs.microsoft.com/en-gb/aspnet/core/spa/index#installation

Docs:
https://docs.microsoft.com/en-gb/aspnet/core/spa/angular?tabs=visual-studio

The dotnet template uses Angular CLI and can be found in the ClientApp folder.

Update all the npm packages including the Angular-CLI, and do a npm install, or use yarn to update the packages.

Add the angular-auth-oidc-client which implements the OIDC Implicit Flow for Angular applications.

{
  "name": "dotnet_angular",
  "version": "0.0.0",
  "license": "MIT",
  "scripts": {
    "ng": "ng",
    "start": "ng serve --extract-css",
    "build": "ng build --extract-css",
    "build:ssr": "npm run build -- --app=ssr --output-hashing=media",
    "test": "ng test",
    "lint": "ng lint",
    "e2e": "ng e2e"
  },
  "private": true,
  "dependencies": {
    "@angular-devkit/core": "0.0.28",
    "@angular/animations": "^5.2.1",
    "@angular/common": "^5.2.1",
    "@angular/compiler": "^5.2.1",
    "@angular/core": "^5.2.1",
    "@angular/forms": "^5.2.1",
    "@angular/http": "^5.2.1",
    "@angular/platform-browser": "^5.2.1",
    "@angular/platform-browser-dynamic": "^5.2.1",
    "@angular/platform-server": "^5.2.1",
    "@angular/router": "^5.2.1",
    "@nguniversal/module-map-ngfactory-loader": "^5.0.0-beta.5",
    "angular-auth-oidc-client": "4.0.0",
    "aspnet-prerendering": "^3.0.1",
    "bootstrap": "^4.0.0",
    "core-js": "^2.5.3",
    "es6-promise": "^4.2.2",
    "rxjs": "^5.5.6",
    "zone.js": "^0.8.20"
  },
  "devDependencies": {
    "@angular/cli": "1.6.5",
    "@angular/compiler-cli": "^5.2.1",
    "@angular/language-service": "^5.2.1",
    "@types/jasmine": "~2.8.4",
    "@types/jasminewd2": "~2.0.3",
    "@types/node": "~9.3.0",
    "codelyzer": "^4.1.0",
    "jasmine-core": "~2.9.1",
    "jasmine-spec-reporter": "~4.2.1",
    "karma": "~2.0.0",
    "karma-chrome-launcher": "~2.2.0",
    "karma-cli": "~1.0.1",
    "karma-coverage-istanbul-reporter": "^1.3.3",
    "karma-jasmine": "~1.1.1",
    "karma-jasmine-html-reporter": "^0.2.2",
    "protractor": "~5.2.2",
    "ts-node": "~4.1.0",
    "tslint": "~5.9.1",
    "typescript": "~2.6.2"
  }
}

Azure AD does not support CORS, so you have to GET the .well-known/openid-configuration with your tenant and add them to your application as a Json file.

https://login.microsoftonline.com/damienbod.onmicrosoft.com/.well-known/openid-configuration

Do the same for the jwt keys
https://login.microsoftonline.com/common/discovery/keys

Now change the URL in the well-known/openid-configuration json file to use the downloaded version of the keys.

{
  "authorization_endpoint": "https://login.microsoftonline.com/a0958f45-195b-4036-9259-de2f7e594db6/oauth2/authorize",
  "token_endpoint": "https://login.microsoftonline.com/a0958f45-195b-4036-9259-de2f7e594db6/oauth2/token",
  "token_endpoint_auth_methods_supported": [ "client_secret_post", "private_key_jwt", "client_secret_basic" ],
  "jwks_uri": "https://localhost:44347/jwks.json",
  "response_modes_supported": [ "query", "fragment", "form_post" ],
  "subject_types_supported": [ "pairwise" ],
  "id_token_signing_alg_values_supported": [ "RS256" ],
  "http_logout_supported": true,
  "frontchannel_logout_supported": true,
  "end_session_endpoint": "https://login.microsoftonline.com/a0958f45-195b-4036-9259-de2f7e594db6/oauth2/logout",
  "response_types_supported": [ "code", "id_token", "code id_token", "token id_token", "token" ],
  "scopes_supported": [ "openid" ],
  "issuer": "https://sts.windows.net/a0958f45-195b-4036-9259-de2f7e594db6/",
  "claims_supported": [ "sub", "iss", "cloud_instance_name", "cloud_instance_host_name", "cloud_graph_host_name", "msgraph_host", "aud", "exp", "iat", "auth_time", "acr", "amr", "nonce", "email", "given_name", "family_name", "nickname" ],
  "microsoft_multi_refresh_token": true,
  "check_session_iframe": "https://login.microsoftonline.com/a0958f45-195b-4036-9259-de2f7e594db6/oauth2/checksession",
  "userinfo_endpoint": "https://login.microsoftonline.com/a0958f45-195b-4036-9259-de2f7e594db6/openid/userinfo",
  "tenant_region_scope": "NA",
  "cloud_instance_name": "microsoftonline.com",
  "cloud_graph_host_name": "graph.windows.net",
  "msgraph_host": "graph.microsoft.com"
}

This can now be used in the APP_INITIALIZER of the app.module. In the OIDC configuration, set the OpenIDImplicitFlowConfiguration object to match the Azure AD application which was configured before.

import { BrowserModule } from '@angular/platform-browser';
import { NgModule, APP_INITIALIZER } from '@angular/core';
import { FormsModule } from '@angular/forms';
import { HttpClientModule } from '@angular/common/http';
import { RouterModule } from '@angular/router';

import { AppComponent } from './app.component';
import { NavMenuComponent } from './nav-menu/nav-menu.component';
import { HomeComponent } from './home/home.component';

import {
  AuthModule,
  OidcSecurityService,
  OpenIDImplicitFlowConfiguration,
  OidcConfigService,
  AuthWellKnownEndpoints
} from 'angular-auth-oidc-client';
import { AutoLoginComponent } from './auto-login/auto-login.component';
import { routing } from './app.routes';
import { ForbiddenComponent } from './forbidden/forbidden.component';
import { UnauthorizedComponent } from './unauthorized/unauthorized.component';
import { ProtectedComponent } from './protected/protected.component';
import { AuthorizationGuard } from './authorization.guard';
import { environment } from '../environments/environment';

export function loadConfig(oidcConfigService: OidcConfigService) {
  console.log('APP_INITIALIZER STARTING');
  // https://login.microsoftonline.com/damienbod.onmicrosoft.com/.well-known/openid-configuration
  // jwt keys: https://login.microsoftonline.com/common/discovery/keys
  // Azure AD does not support CORS, so you need to download the OIDC configuration, and use these from the application.
  // The jwt keys needs to be configured in the well-known-openid-configuration.json
  return () => oidcConfigService.load_using_custom_stsServer('https://localhost:44347/well-known-openid-configuration.json');
}

@NgModule({
  declarations: [
    AppComponent,
    NavMenuComponent,
    HomeComponent,
    AutoLoginComponent,
    ForbiddenComponent,
    UnauthorizedComponent,
    ProtectedComponent
  ],
  imports: [
    BrowserModule.withServerTransition({ appId: 'ng-cli-universal' }),
    HttpClientModule,
    AuthModule.forRoot(),
    FormsModule,
    routing,
  ],
  providers: [
	  OidcSecurityService,
	  OidcConfigService,
	  {
		  provide: APP_INITIALIZER,
		  useFactory: loadConfig,
		  deps: [OidcConfigService],
		  multi: true
    },
    AuthorizationGuard
	],
  bootstrap: [AppComponent]
})

export class AppModule {

  constructor(
    private oidcSecurityService: OidcSecurityService,
    private oidcConfigService: OidcConfigService,
  ) {
    this.oidcConfigService.onConfigurationLoaded.subscribe(() => {

      const openIDImplicitFlowConfiguration = new OpenIDImplicitFlowConfiguration();
      openIDImplicitFlowConfiguration.stsServer = 'https://login.microsoftonline.com/damienbod.onmicrosoft.com';
      openIDImplicitFlowConfiguration.redirect_url = 'https://localhost:44347';
      openIDImplicitFlowConfiguration.client_id = 'fd87184a-00c2-4aee-bc72-c7c1dd468e8f';
      openIDImplicitFlowConfiguration.response_type = 'id_token token';
      openIDImplicitFlowConfiguration.scope = 'openid profile email ';
      openIDImplicitFlowConfiguration.post_logout_redirect_uri = 'https://localhost:44347';
      openIDImplicitFlowConfiguration.post_login_route = '/home';
      openIDImplicitFlowConfiguration.forbidden_route = '/home';
      openIDImplicitFlowConfiguration.unauthorized_route = '/home';
      openIDImplicitFlowConfiguration.auto_userinfo = false;
      openIDImplicitFlowConfiguration.log_console_warning_active = true;
      openIDImplicitFlowConfiguration.log_console_debug_active = !environment.production;
      openIDImplicitFlowConfiguration.max_id_token_iat_offset_allowed_in_seconds = 600;

      const authWellKnownEndpoints = new AuthWellKnownEndpoints();
      authWellKnownEndpoints.setWellKnownEndpoints(this.oidcConfigService.wellKnownEndpoints);

      this.oidcSecurityService.setupModule(openIDImplicitFlowConfiguration, authWellKnownEndpoints);
      this.oidcSecurityService.setCustomRequestParameters({ 'prompt': 'admin_consent', 'resource': 'https://graph.windows.net'});
    });

    console.log('APP STARTING');
  }
}

Now an Auth Guard can be added to protect the protected routes.

import { Injectable } from '@angular/core';
import { Router, CanActivate, ActivatedRouteSnapshot, RouterStateSnapshot } from '@angular/router';
import { Observable } from 'rxjs/Observable';
import { map } from 'rxjs/operators';
import { OidcSecurityService } from 'angular-auth-oidc-client';

@Injectable()
export class AuthorizationGuard implements CanActivate {

  constructor(
    private router: Router,
    private oidcSecurityService: OidcSecurityService
  ) { }

  public canActivate(route: ActivatedRouteSnapshot, state: RouterStateSnapshot): Observable<boolean> | boolean {
    console.log(route + '' + state);
    console.log('AuthorizationGuard, canActivate');

    return this.oidcSecurityService.getIsAuthorized().pipe(
      map((isAuthorized: boolean) => {
        console.log('AuthorizationGuard, canActivate isAuthorized: ' + isAuthorized);

        if (isAuthorized) {
          return true;
        }

        this.router.navigate(['/unauthorized']);
        return false;
      })
    );
  }
}

You can then add an app.routes and protect what you require.

import { Routes, RouterModule } from '@angular/router';

import { ForbiddenComponent } from './forbidden/forbidden.component';
import { HomeComponent } from './home/home.component';
import { UnauthorizedComponent } from './unauthorized/unauthorized.component';
import { AutoLoginComponent } from './auto-login/auto-login.component';
import { ProtectedComponent } from './protected/protected.component';
import { AuthorizationGuard } from './authorization.guard';

const appRoutes: Routes = [
  { path: '', component: HomeComponent, pathMatch: 'full' },
  { path: 'home', component: HomeComponent },
  { path: 'autologin', component: AutoLoginComponent },
  { path: 'forbidden', component: ForbiddenComponent },
  { path: 'unauthorized', component: UnauthorizedComponent },
  { path: 'protected', component: ProtectedComponent, canActivate: [AuthorizationGuard] }
];

export const routing = RouterModule.forRoot(appRoutes);

The NavMenuComponent component is then updated to add the login, logout.

import { Component } from '@angular/core';
import { Subscription } from 'rxjs/Subscription';
import { OidcSecurityService } from 'angular-auth-oidc-client';

@Component({
  selector: 'app-nav-menu',
  templateUrl: './nav-menu.component.html',
  styleUrls: ['./nav-menu.component.css']
})
export class NavMenuComponent {
  isExpanded = false;
  isAuthorizedSubscription: Subscription;
  isAuthorized: boolean;

  constructor(public oidcSecurityService: OidcSecurityService) {
  }

  ngOnInit() {
    this.isAuthorizedSubscription = this.oidcSecurityService.getIsAuthorized().subscribe(
      (isAuthorized: boolean) => {
        this.isAuthorized = isAuthorized;
      });
  }

  ngOnDestroy(): void {
    this.isAuthorizedSubscription.unsubscribe();
  }

  login() {
    this.oidcSecurityService.authorize();
  }

  refreshSession() {
    this.oidcSecurityService.authorize();
  }

  logout() {
    this.oidcSecurityService.logoff();
  }
  collapse() {
    this.isExpanded = false;
  }

  toggle() {
    this.isExpanded = !this.isExpanded;
  }
}

Start the application and click login

Enter your user which is defined in Azure AD

Consent page:

And you are redircted back to the application.

Notes:

If you don’t use any Microsoft API use the id_token flow, and not the id_token token flow. The resource of the API needs to be defined in both the request and also the Azure AD app definitions.

Links:

https://docs.microsoft.com/en-gb/aspnet/core/spa/angular?tabs=visual-studio

https://portal.azure.com


Securing an ASP.NET Core MVC application which uses a secure API

$
0
0

The article shows how an ASP.NET Core MVC application can implement security when using an API to retrieve data. The OpenID Connect Hybrid flow is used to secure the ASP.NET Core MVC application. The application uses tokens stored in a cookie. This cookie is not used to access the API. The API is protected using a bearer token.

To access the API, the code running on the server of the ASP.NET Core MVC application, implements the OAuth2 client credentials resource owner flow to get the access token for the API and can then return the data to the razor views.

Code: https://github.com/damienbod/AspNetCoreHybridFlowWithApi

Setup

IdentityServer4 and OpenID connect flow configuration

Two client configurations are setup in the IdentityServer4 configuration class. The OpenID Connect Hybrid Flow client is used for the ASP.NET Core MVC application. This flow, after a successful login, will return a cookie to the client part of the application which contains the tokens. The second client is used for the API. This is a service to service communication between two trusted applications. This usually happens in a protected zone. The client API uses a secret to connect to the API. The secret should be a secret and different for each deployment.

public static IEnumerable<Client> GetClients()
{
	return new List<Client>
	{
		new Client
		{
			ClientName = "hybridclient",
			ClientId = "hybridclient",
			ClientSecrets = {new Secret("hybrid_flow_secret".Sha256()) },
			AllowedGrantTypes = GrantTypes.Hybrid,
			AllowOfflineAccess = true,
			RedirectUris = { "https://localhost:44329/signin-oidc" },
			PostLogoutRedirectUris = { "https://localhost:44329/signout-callback-oidc" },
			AllowedCorsOrigins = new List<string>
			{
				"https://localhost:44329/"
			},
			AllowedScopes = new List<string>
			{
				IdentityServerConstants.StandardScopes.OpenId,
				IdentityServerConstants.StandardScopes.Profile,
				IdentityServerConstants.StandardScopes.OfflineAccess,
				"scope_used_for_hybrid_flow",
				"role"
			}
		},
		new Client
		{
			ClientId = "ProtectedApi",
			ClientName = "ProtectedApi",
			ClientSecrets = new List<Secret> { new Secret { Value = "api_in_protected_zone_secret".Sha256() } },
			AllowedGrantTypes = GrantTypes.ClientCredentials,
			AllowedScopes = new List<string> { "scope_used_for_api_in_protected_zone" }
		}
	};
}

The GetApiResources defines the scopes and the APIs for the different resources. I usually define one scope per API resource.

public static IEnumerable<ApiResource> GetApiResources()
{
	return new List<ApiResource>
	{
		new ApiResource("scope_used_for_hybrid_flow")
		{
			ApiSecrets =
			{
				new Secret("hybrid_flow_secret".Sha256())
			},
			Scopes =
			{
				new Scope
				{
					Name = "scope_used_for_hybrid_flow",
					DisplayName = "Scope for the scope_used_for_hybrid_flow ApiResource"
				}
			},
			UserClaims = { "role", "admin", "user", "some_api" }
		},
		new ApiResource("ProtectedApi")
		{
			DisplayName = "API protected",
			ApiSecrets =
			{
				new Secret("api_in_protected_zone_secret".Sha256())
			},
			Scopes =
			{
				new Scope
				{
					Name = "scope_used_for_api_in_protected_zone",
					ShowInDiscoveryDocument = false
				}
			},
			UserClaims = { "role", "admin", "user", "safe_zone_api" }
		}
	};
}

Securing the Resource API

The protected API uses the IdentityServer4.AccessTokenValidation Nuget package to validate the access token. This uses the introspection endpoint to validate the token. The scope is also validated in this example using authorization policies from ASP.NET Core.

public void ConfigureServices(IServiceCollection services)
{
	services.AddAuthentication(IdentityServerAuthenticationDefaults.AuthenticationScheme)
	  .AddIdentityServerAuthentication(options =>
	  {
		  options.Authority = "https://localhost:44352";
		  options.ApiName = "ProtectedApi";
		  options.ApiSecret = "api_in_protected_zone_secret";
		  options.RequireHttpsMetadata = true;
	  });

	services.AddAuthorization(options =>
		options.AddPolicy("protectedScope", policy =>
		{
			policy.RequireClaim("scope", "scope_used_for_api_in_protected_zone");
		})
	);

	services.AddMvc();
}

The API is protected using the Authorize attribute and checks the defined policy. If this is ok, the data can be returned to the server part of the MVC application.

[Authorize(Policy = "protectedScope")]
[Route("api/[controller]")]
public class ValuesController : Controller
{
	[HttpGet]
	public IEnumerable<string> Get()
	{
		return new string[] { "data 1 from the second api", "data 2 from the second api" };
	}
}

Securing the ASP.NET Core MVC application

The ASP.NET Core MVC application uses OpenID Connect to validate the user and the application and saves the result in a cookie. If the identity is ok, the tokens are returned in the cookie from the server side of the application. See the OpenID Connect specification, for more information concerning the OpenID Connect Hybrid flow.

public void ConfigureServices(IServiceCollection services)
{
	services.AddAuthentication(options =>
	{
		options.DefaultScheme = CookieAuthenticationDefaults.AuthenticationScheme;
		options.DefaultChallengeScheme = OpenIdConnectDefaults.AuthenticationScheme;
	})
	.AddCookie()
	.AddOpenIdConnect(options =>
	{
		options.SignInScheme = "Cookies";
		options.Authority = "https://localhost:44352";
		options.RequireHttpsMetadata = true;
		options.ClientId = "hybridclient";
		options.ClientSecret = "hybrid_flow_secret";
		options.ResponseType = "code id_token";
		options.Scope.Add("scope_used_for_hybrid_flow");
		options.Scope.Add("profile");
		options.SaveTokens = true;
	});

	services.AddAuthorization();

	services.AddMvc();
}

The Configure method adds the authentication to the MVC middleware using the UseAuthentication extension method.

public void Configure(IApplicationBuilder app, IHostingEnvironment env, ILoggerFactory loggerFactory)
{
	...

	app.UseStaticFiles();

	app.UseAuthentication();

	app.UseMvc(routes =>
	{
		routes.MapRoute(
			name: "default",
			template: "{controller=Home}/{action=Index}/{id?}");
	});
}

The home controller is protected using the authorize attribute, and the index method gets the data from the API using the api service.

[Authorize]
public class HomeController : Controller
{
	private readonly ApiService _apiService;

	public HomeController(ApiService apiService)
	{
		_apiService = apiService;
	}

	public async System.Threading.Tasks.Task<IActionResult> Index()
	{
		var result = await _apiService.GetApiDataAsync();

		ViewData["data"] = result.ToString();
		return View();
	}

	public IActionResult Error()
	{
		return View(new ErrorViewModel { RequestId = Activity.Current?.Id ?? HttpContext.TraceIdentifier });
	}
}

Calling the protected API from the ASP.NET Core MVC app

The API service implements the HTTP request using the TokenClient from IdentiyModel. This can be downloaded as a Nuget package. First the access token is acquired from the server, then the token is used to request the data from the API.

var discoClient = new DiscoveryClient("https://localhost:44352");
var disco = await discoClient.GetAsync();
if (disco.IsError)
{
	throw new ApplicationException($"Status code: {disco.IsError}, Error: {disco.Error}");
}

var tokenClient = new TokenClient(disco.TokenEndpoint, "ProtectedApi", "api_in_protected_zone_secret");
var tokenResponse = await tokenClient.RequestClientCredentialsAsync("scope_used_for_api_in_protected_zone");

if (tokenResponse.IsError)
{
	throw new ApplicationException($"Status code: {tokenResponse.IsError}, Error: {tokenResponse.Error}");
}

using (var client = new HttpClient())
{
	client.BaseAddress = new Uri("https://localhost:44342");
	client.SetBearerToken(tokenResponse.AccessToken);

	var response = await client.GetAsync("/api/values");
	if (response.IsSuccessStatusCode)
	{
		var responseContent = await response.Content.ReadAsStringAsync();
		var data = JArray.Parse(responseContent);

		return data;
	}

	throw new ApplicationException($"Status code: {response.StatusCode}, Error: {response.ReasonPhrase}");
}

Authentication and Authorization in the API

The ASP.NET Core MVC application calls the API using a service to service trusted association in the protected zone. Due to this, the identity which made the original request cannot be validated using the access token on the API. If authorization is required for the original identity, this should be sent in the URL of the API HTTP request, which can then be validated as required using an authorization filter. Maybe it is enough to validate that the service token is authenticated, and authorized. Care should be taken when sending user data, GDPR requirements, or user information which the IT admins should not have access to.

Should I use the same token as the access token returned to the MVC client?

This depends 🙂 If the API is a public API, then this is fine, if you have no problem re-using the same token for different applications. If the API is in the protected zone, for example behind a WAF, then a separate token would be better. Only tokens issued for the trusted app can be used to access the protected API. This can be validated by using separate scopes, secrets, etc. The tokens issued for the MVC app and the user, will not work, these were issued for a single purpose only, and not multiple applications. The token used for the protected API never leaves the trusted zone.

Links

https://docs.microsoft.com/en-gb/aspnet/core/mvc/overview

https://docs.microsoft.com/en-gb/aspnet/core/security/anti-request-forgery

https://docs.microsoft.com/en-gb/aspnet/core/security/

http://openid.net/

https://www.owasp.org/images/b/b0/Best_Practices_WAF_v105.en.pdf

https://tools.ietf.org/html/rfc7662

http://docs.identityserver.io/en/release/quickstarts/5_hybrid_and_api_access.html

https://github.com/aspnet/Security

https://elanderson.net/2017/07/identity-server-from-implicit-to-hybrid-flow/

http://openid.net/specs/openid-connect-core-1_0.html#HybridFlowAuth

Adding HTTP Headers to improve Security in an ASP.NET MVC Core application

$
0
0

This article shows how to add headers in a HTTPS response for an ASP.NET Core MVC application. The HTTP headers help protect against some of the attacks which can be executed against a website. securityheaders.io is used to test and validate the HTTP headers as well as F12 in the browser. NWebSec is used to add most of the HTTP headers which improve security for the MVC application. Thanks to Scott Helme for creating securityheaders.io, and André N. Klingsheim for creating NWebSec.

Code: https://github.com/damienbod/AspNetCoreHybridFlowWithApi

2018-02-09: Updated, added feedback from different sources, removing extra headers, add form actions to the CSP configuration, adding info about CAA.

A simple ASP.NET Core MVC application was created and deployed to Azure. securityheaders.io can be used to validate the headers in the application. The deployed application used in this post can be found here: https://webhybridclient20180206091626.azurewebsites.net/status/test

Testing the default application using securityheaders.io gives the following results with some room for improvement.

Fixing this in ASP.NET Core is pretty easy due to NWebSec. Add the NuGet package to the project.

<PackageReference Include="NWebsec.AspNetCore.Middleware" Version="1.1.0" />

Or using the NuGet Package Manager in Visual Studio

Add the Strict-Transport-Security Header

By using HSTS, you can force that all communication is done using HTTPS. If you want to force HTTPS on the first request from the browser, you can use the HSTS preload: https://hstspreload.appspot.com

app.UseHsts(hsts => hsts.MaxAge(365).IncludeSubdomains());

https://en.wikipedia.org/wiki/HTTP_Strict_Transport_Security

Add the X-Content-Type-Options Header

The X-Content-Type-Options can be set to no-sniff to prevent content sniffing.

app.UseXContentTypeOptions();

https://www.keycdn.com/support/what-is-mime-sniffing/

https://en.wikipedia.org/wiki/Content_sniffing

Add the Referrer Policy Header

This allows us to restrict the amount of information being passed on to other sites when referring to other sites. This is set to no referrer.

app.UseReferrerPolicy(opts => opts.NoReferrer());

https://developer.mozilla.org/en-US/docs/Web/HTTP/Headers/Referrer-Policy

Scott Helme write a really good post on this:
https://scotthelme.co.uk/a-new-security-header-referrer-policy/

Add the X-XSS-Protection Header

The HTTP X-XSS-Protection response header is a feature of Internet Explorer, Chrome and Safari that stops pages from loading when they detect reflected cross-site scripting (XSS) attacks. (Text copied from here)

app.UseXXssProtection(options => options.EnabledWithBlockMode());

https://developer.mozilla.org/en-US/docs/Web/HTTP/Headers/X-XSS-Protection

Add the X-Frame-Options Header

You can use the X-frame-options Header to block iframes and prevent click jacking attacks.

app.UseXfo(options => options.Deny());

Add the Content-Security-Policy Header

Content Security Policy can be used to prevent all sort of attacks, XSS, click-jacking attacks, or prevent mixed mode (HTTPS and HTTP). The following configuration works for ASP.NET Core MVC applications, the mixed mode is activated, styles can be read from unsafe inline, due to the razor controls, or tag helpers, and everything can only be loaded from the same origin.

app.UseCsp(opts => opts
	.BlockAllMixedContent()
	.StyleSources(s => s.Self())
	.StyleSources(s => s.UnsafeInline())
	.FontSources(s => s.Self())
	.FormActions(s => s.Self())
	.FrameAncestors(s => s.Self())
	.ImageSources(s => s.Self())
	.ScriptSources(s => s.Self())
);

Due to this CSP configuration, the public CDNs need to be removed from the MVC application which are per default included in the dotnet template for an ASP.NET Core MVC application.

https://developer.mozilla.org/en-US/docs/Web/HTTP/CSP

NWebSec configuration in the Startup

//Registered before static files to always set header
app.UseHsts(hsts => hsts.MaxAge(365).IncludeSubdomains());
app.UseXContentTypeOptions();
app.UseReferrerPolicy(opts => opts.NoReferrer());
app.UseXXssProtection(options => options.EnabledWithBlockMode());
app.UseXfo(options => options.Deny());

app.UseCsp(opts => opts
	.BlockAllMixedContent()
	.StyleSources(s => s.Self())
	.StyleSources(s => s.UnsafeInline())
	.FontSources(s => s.Self())
	.FormActions(s => s.Self())
	.FrameAncestors(s => s.Self())
	.ImageSources(s => s.Self())
	.ScriptSources(s => s.Self())
);

app.UseStaticFiles();

When the application is tested again, things look much better.

Or view the headers in the browser, for example F12 in Chrome, and then the network view:

Here’s the securityheaders.io test results for this demo.

https://securityheaders.io/?q=https%3A%2F%2Fwebhybridclient20180206091626.azurewebsites.net%2Fstatus%2Ftest&followRedirects=on

Removing the extra infomation from the Headers

You could also remove the extra information from the HTTPS headers, for example X-Powered-By, or Server, so that less information is sent to the client.

Remove the server headers from the kestrel server, by using the UseKestrel extension method.

.UseKestrel(c => c.AddServerHeader = false)

Add a web.config to your project with the following settings:

<?xml version="1.0" encoding="UTF-8"?>
<configuration>
  <system.web>
    <httpRuntime enableVersionHeader="false"/>
  </system.web>
  <system.webServer>
    <security>
      <requestFiltering removeServerHeader="true" />
    </security>
    <httpProtocol>
      <customHeaders>
        <remove name="X-Powered-By"/>
      </customHeaders>
    </httpProtocol>
  </system.webServer>
</configuration>

Now by viewing the response in the browser, you can see some unrequired headers have been removed.


Further steps in hardening the application:

Use CAA

You can fix your domain to a selected amount of authorities. You can control the authorities which can issue the certs for your domain. This reduces the risk, that another cert authority produces a cert for your domain to a different person. This can be checked here:

https://toolbox.googleapps.com/apps/dig/

Or configured here:
https://sslmate.com/caa/

Then add it to the hosting provider.

Use a WAF

You could also add a WAF, for example to only expose public URLs and not private ones, or protect against DDoS attacks.

Certificate testing

The certificate should also be tested and validated.

https://www.ssllabs.com is a good test tool.

Here’s the result for the cert used in the demo project.

https://www.ssllabs.com/ssltest/analyze.html?d=webhybridclient20180206091626.azurewebsites.net

I would be grateful for feedback, or suggestions to improve this.

Links:

https://securityheaders.io

https://docs.nwebsec.com/en/latest/

https://github.com/NWebsec/NWebsec

https://www.troyhunt.com/shhh-dont-let-your-response-headers/

https://anthonychu.ca/post/aspnet-core-csp/

https://rehansaeed.com/content-security-policy-for-asp-net-mvc/

https://en.wikipedia.org/wiki/HTTP_Strict_Transport_Security

https://www.troyhunt.com/the-6-step-happy-path-to-https/

https://www.troyhunt.com/understanding-http-strict-transport/

https://hstspreload.appspot.com

https://geekflare.com/http-header-implementation/

https://developer.mozilla.org/en-US/docs/Web/HTTP/Headers/X-Content-Type-Options

https://docs.microsoft.com/en-us/aspnet/core/tutorials/publish-to-azure-webapp-using-vs

https://developer.mozilla.org/en-US/docs/Web/HTTP/Public_Key_Pinning

https://toolbox.googleapps.com/apps/dig/

https://sslmate.com/caa/

Securing the CDN links in the ASP.NET Core 2.1 templates

$
0
0

This article uses the the ASP.NET Core 2.1 MVC template and shows how to secure the CDN links using the integrity parameter.

A new ASP.NET Core MVC application was created using the 2.1 template in Visual Studio.

This template uses HTTPS per default and has added some of the required HTTPS headers like HSTS which is required for any application. The template has added the integrity parameter to the javascript CDN links, but on the CSS CDN links, it is missing.

<script src="https://ajax.aspnetcdn.com/ajax/jquery/jquery-2.2.0.min.js"
 asp-fallback-src="~/lib/jquery/dist/jquery.min.js"
 asp-fallback-test="window.jQuery"  
 crossorigin="anonymous"
 integrity="sha384-K+ctZQ+LL8q6tP7I94W+qzQsfRV2a+AfHIi9k8z8l9ggpc8X+Ytst4yBo/hH+8Fk">
</script>

If the value of the integrity is changed, or the CDN script was changed, or for example a bitcoin miner was added to it, the MVC application will not load the script.

To test this, you can change the value of the integrity parameter on the script, and in the production environment, the script will not load and fallback to the localhost deployed script. By changing the value of the integrity parameter, it simulates a changed script on the CDN. The following snapshot shows an example of the possible errors sent to the browser:

Adding the integrity parameter to the CSS link

The template creates a bootstrap link in the _Layout.cshtml as follows:

<link rel="stylesheet" href="https://ajax.aspnetcdn.com/ajax/bootstrap/3.3.7/css/bootstrap.min.css"
              asp-fallback-href="~/lib/bootstrap/dist/css/bootstrap.min.css"
              asp-fallback-test-class="sr-only" asp-fallback-test-property="position" asp-fallback-test-value="absolute" />

This is missing the integrity parameter. To fix this, the integrity parameter can be added to the link.

<link rel="stylesheet" 
          integrity="sha384-BVYiiSIFeK1dGmJRAkycuHAHRg32OmUcww7on3RYdg4Va+PmSTsz/K68vbdEjh4u" 
          crossorigin="anonymous"
          href="https://ajax.aspnetcdn.com/ajax/bootstrap/3.3.7/css/bootstrap.min.css"
          asp-fallback-href="~/lib/bootstrap/dist/css/bootstrap.min.css"
          asp-fallback-test-class="sr-only"
          asp-fallback-test-property="position" 
          asp-fallback-test-value="absolute" />

The value of the integrity parameter was created using SRI Hash Generator. When creating this, you have to be sure, that the link is safe. By using this CDN, your application trusts the CDN links.

Now if the css file was changed on the CDN server, the application will not load it.

The CSP Header of the application can also be improved. The application should only load from the required CDNs and no where else. This can be forced by adding the following CSP configuration:

content-security-policy: 
script-src 'self' https://ajax.aspnetcdn.com;
style-src 'self' https://ajax.aspnetcdn.com;
img-src 'self';
font-src 'self' https://ajax.aspnetcdn.com;
form-action 'self';
frame-ancestors 'self';
block-all-mixed-content

Or you can use NWebSec and add it to the startup.cs

app.UseCsp(opts => opts
	.BlockAllMixedContent()
	.FontSources(s => s.Self()
		.CustomSources("https://ajax.aspnetcdn.com"))
	.FormActions(s => s.Self())
	.FrameAncestors(s => s.Self())
	.ImageSources(s => s.Self())
	.StyleSources(s => s.Self()
		.CustomSources("https://ajax.aspnetcdn.com"))
	.ScriptSources(s => s.Self()
		.UnsafeInline()
		.CustomSources("https://ajax.aspnetcdn.com"))
);

Links:

https://developer.mozilla.org/en-US/docs/Web/Security/Subresource_Integrity

https://www.srihash.org/

https://www.troyhunt.com/protecting-your-embedded-content-with-subresource-integrity-sri/

https://scotthelme.co.uk/tag/cdn/

https://rehansaeed.com/tag/subresource-integrity-sri/

https://rehansaeed.com/subresource-integrity-taghelper-using-asp-net-core/

First experiments with makecode and micro:bit

$
0
0

At the MVP Global Summit, I heard about MakeCode for the first time. The project makes it really easy for people to get a first contact, introduction with code and computer science. I got the chance to play around with the Micro:bit which has a whole range of sensors and can easily be programmed from MakeCode.

I decided to experiment and tried it out with two 12 year olds and a 10 ten old.

MakeCode

The https://makecode.com/ website provides a whole range of links, getting started lessons, or great ideas on how people can use this. We experimented firstly with the MakeCode Micro:bit. This software can be run from any browser, and the https://makecode.microbit.org/ can be used to experiment, or programme the Micro:bit.

Micro:bit

The Micro:bit is a 32 bit arm computer with all types of sensors, inputs and outputs. Here’s a link with the features: http://microbit.org/guide/features/

The Micro:bit can be purchased almost anywhere in the world. Links for your country can be found here: https://www.microbit.org/resellers/

The Micro:bit can be connected to your computer using a USB cable.

Testing

Once setup, I gave the kids a simple introduction, explained the different blocks, and very quickly they started to experiment themselves. The first results looked like this, which they called a magic show. Kind of like the name.

I also explained the code, and they could understand how to change to code, and how it mapped back to the block code. The mapping between the block code, and the text code is a fantastic feature of MakeCode. First question was why bother with the text code, which meant they understood the relationship, so I could explain the advantages then.

input.onButtonPressed(Button.A, () => {
    basic.showString("HELLO!")
    basic.pause(2000)
})
input.onGesture(Gesture.FreeFall, () => {
    basic.showIcon(IconNames.No)
    basic.pause(4000)
})
input.onButtonPressed(Button.AB, () => {
    basic.showString("DAS WARS")
})
input.onButtonPressed(Button.B, () => {
    basic.showIcon(IconNames.Angry)
})
input.onGesture(Gesture.Shake, () => {
    basic.showLeds(`
        # # # # #
        # # # # #
        # # # # #
        # # # # #
        # # # # #
        `)
})
basic.forever(() => {
    led.plot(2, 2)
    basic.pause(30)
    led.unplot(2, 2)
    basic.pause(300)
})

Then it was downloaded to the Micro:bit. The MakeCode Micro:bit software provides a download button. If you use this from the browser, it creates a hex file, which can be downloaded to the hardware per drag and drop. If you use the MakeCode Micro:bit Windows Store application, it will download it directly for you.

Once downoaded, the magic show could begin.

The following was produced by the 10 year, who needed a bit more help. He discovered the sound.

Notes

This is a super project, and would highly recommended it to schools, or as a present for kids. There are so many ways to try out new things, or code with different hardware, or even Minecraft. The kids have started to introduce it to other kids already. It would be great, if they could do this in school. If you have questions or queries, the MakeCode team are really helpful and can be reached here at twitter: @MsMakeCode, or you can create a github issue. The docs are really excellent if you require help with programming, and provides some really cool examples and ideas.

Links:

http://makecode.com/

https://makecode.microbit.org/

https://www.microbit.org/resellers/

http://microbit.org/guide/features/

Using Message Pack with ASP.NET Core SignalR

$
0
0

This post shows how SignalR could be used to send messages between different C# console clients using Message Pack as the protocol. An ASP.NET Core web application is used to host the SignalR Hub.

Code: https://github.com/damienbod/AspNetCoreAngularSignalR

Setting up the Message Pack SignalR server

Add the Microsoft.AspNetCore.SignalR and the Microsoft.AspNetCore.SignalR.MsgPack NuGet packages to the ASP.NET Core server application where the SignalR Hub will be hosted. The Visual Studio NuGet Package Manager can be used for this.

Or just add it directly to the .csproj project file.

<PackageReference 
   Include="Microsoft.AspNetCore.SignalR" 
   Version="1.0.0-preview1-final" />
<PackageReference 
   Include="Microsoft.AspNetCore.SignalR.MsgPack" 
   Version="1.0.0-preview1-final" />

Setup a SignalR Hub as required. This is done by implementing the Hub class.

using Dtos;
using Microsoft.AspNetCore.SignalR;
using System.Threading.Tasks;

namespace AspNetCoreAngularSignalR.SignalRHubs
{
    // Send messages using Message Pack binary formatter
    public class LoopyMessageHub : Hub
    {
        public Task Send(MessageDto data)
        {
            return Clients.All.SendAsync("Send", data);
        }
    }
}

A DTO class is created to send the Message Pack messages. Notice that the class is a plain C# class with no Message Pack attributes, or properties.

using System;

namespace Dtos
{
    public class MessageDto
    {
        public Guid Id { get; set; }

        public string Name { get; set; }

        public int Amount { get; set; }
    }
}

Then add the Message Pack protocol to the SignalR service.

services.AddSignalR(options =>
{
	options.KeepAliveInterval = TimeSpan.FromSeconds(5);
})
.AddMessagePackProtocol();

And configure the SignalR Hub in the Startup class Configure method of the ASP.NET Core server application.

app.UseSignalR(routes =>
{
	routes.MapHub<LoopyMessageHub>("/loopymessage");
});

Setting up the Message Pack SignalR client

Add the Microsoft.AspNetCore.SignalR.Client and the Microsoft.AspNetCore.SignalR.Client.MsgPack NuGet packages to the SignalR client console application.

The packages are added to the project file.

<PackageReference  
   Include="Microsoft.AspNetCore.SignalR.Client" 
   Version="1.0.0-preview1-final" />
<PackageReference  
   Include="Microsoft.AspNetCore.SignalR.Client.MsgPack" 
   Version="1.0.0-preview1-final" />

Create a Hub client connection using the Message Pack Protocol. The Url must match the URL configuration on the server.

public static async Task SetupSignalRHubAsync()
{
 _hubConnection = new HubConnectionBuilder()
   .WithUrl("https://localhost:44324/loopymessage")
   .WithMessagePackProtocol()
   .WithConsoleLogger()
   .Build();

 await _hubConnection.StartAsync();
}

The Hub can then be used to send or receive SignalR messages using the Message Pack as the binary serializer.

using Dtos;
using Microsoft.AspNetCore.SignalR.Client;
using System;
using System.Threading.Tasks;

namespace ConsoleSignalRMessagePack
{
    class Program
    {
        private static HubConnection _hubConnection;

        public static void Main(string[] args) => MainAsync().GetAwaiter().GetResult();

        static async Task MainAsync()
        {
            await SetupSignalRHubAsync();
            _hubConnection.On<MessageDto>("Send", (message) =>
            {
                Console.WriteLine($"Received Message: {message.Name}");
            });
            Console.WriteLine("Connected to Hub");
            Console.WriteLine("Press ESC to stop");
            do
            {
                while (!Console.KeyAvailable)
                {
                    var message = Console.ReadLine();
                    await _hubConnection.SendAsync("Send", new MessageDto() { Id = Guid.NewGuid(), Name = message, Amount = 7 });
                    Console.WriteLine("SendAsync to Hub");
                }
            }
            while (Console.ReadKey(true).Key != ConsoleKey.Escape);

            await _hubConnection.DisposeAsync();
        }

        public static async Task SetupSignalRHubAsync()
        {
            _hubConnection = new HubConnectionBuilder()
                 .WithUrl("https://localhost:44324/loopymessage")
                 .WithMessagePackProtocol()
                 .WithConsoleLogger()
                 .Build();

            await _hubConnection.StartAsync();
        }
    }
}

Testing

Start the server application, and 2 console applications. Then you can send and receive SignalR messages, which use Message Pack as the protocol.


Links:

https://msgpack.org/

https://github.com/aspnet/SignalR

https://github.com/aspnet/SignalR#readme

https://radu-matei.com/blog/signalr-core/

Advertisements

Comparing the HTTPS Security Headers of Swiss banks

$
0
0

This post compares the security HTTP Headers used by different banks in Switzerland. securityheaders.io is used to test each of the websites. The website of each bank as well as the e-banking login was tested. securityheaders.io views the headers like any browser.

The tested security headers help protect against some of the possible attacks, especially during the protected session. I would have expected all the banks to reach at least a grade of A, but was surprised to find, even on the login pages, many websites are missing some of the basic ways of protecting the application.

Credit Suisse provide the best protection for the e-banking login, and Raiffeisen have the best usage of the security headers on the website. Strange that the Raiffeisen webpage is better protected than the Raiffeisen e-banking login.

Scott Helme explains each of the different headers here, and why you should use them:

TEST RESULTS

Best A+, Worst F

e-banking

1. Grade A Credit Suisse
1. Grade A Basler Kantonalbank
3. Grade B Post Finance
3. Grade B Julius Bär
3. Grade B WIR Bank
3. Grade B DC Bank
3. Grade B Berner Kantonalbank
3. Grade B St. Galler Kantonalbank
3. Grade B Thurgauer Kantonalbank
3. Grade B J. Safra Sarasin
11. Grade C Raiffeisen
12. Grade D Zürcher Kantonalbank
13. Grade D UBS
14. Grade D Valiant

web

1. Grade A Raiffeisen
2. Grade A Credit Suisse
2. Grade A WIR Bank
2. Grade A J. Safra Sarasin
5. Grade A St. Galler Kantonalbank
6. Grade B Post Finance
6. Grade B Valiant
8. Grade C Julius Bär
9. Grade C Migros Bank
10. Grade D UBS
11. Grade D Zürcher Kantonalbank
12. Grade D Berner Kantonalbank
13. Grade F DC Bank
14. Grade F Thurgauer Kantonalbank
15. Grade F Basler Kantonalbank

TEST RESULTS DETAILS

UBS

https://www.ubs.com

This is one of the worst protected of all the bank e-banking logins tested. It is missing most of the security headers. The website is also missing most of the security headers.

https://ebanking-ch.ubs.com

The headers returned from the e-banking login is even worst than the D rating, as it is also missing the X-Frame-options protection.

cache-control →no-store, no-cache, must-revalidate, private
connection →Keep-Alive
content-encoding →gzip
content-type →text/html;charset=UTF-8
date →Tue, 27 Mar 2018 11:46:15 GMT
expires →Thu, 1 Jan 1970 00:00:00 GMT
keep-alive →timeout=5, max=10
p3p →CP="OTI DSP CURa OUR LEG COM NAV INT"
server →Apache
strict-transport-security →max-age=31536000
transfer-encoding →chunked

No CSP is present here…

Credit Suisse

The Credit Suisse website and login are protected with most of the headers and have a good CSP. The no-referrer header is missing from the e-banking login and could be added.

https://www.credit-suisse.com/ch/en.html

CSP

default-src 'self' 'unsafe-inline' 'unsafe-eval' data: *.credit-suisse.com 
*.credit-suisse.cspta.ch *.doubleclick.net *.decibelinsight.net 
*.mookie1.com *.demdex.net *.adnxs.com *.facebook.net *.google.com 
*.google-analytics.com *.googletagmanager.com *.google.ch *.googleapis.com 
*.youtube.com *.ytimg.com *.gstatic.com *.googlevideo.com *.twitter.com 
*.twimg.com *.qq.com *.omtrdc.net *.everesttech.net *.facebook.com 
*.adobedtm.com *.ads-twitter.com t.co *.licdn.com *.linkedin.com 
*.credit-suisse.wesit.rowini.net *.zemanta.com *.inbenta.com 
*.adobetag.com sc-static.net

The CORS header is present, but it allows all origins, which is a bit lax, but CORS is not really a securtiy feature. I think is still should be more strict.

https://direct.credit-suisse.com/dn/c/cls/auth?language=en

CSP

default-src dnmb: 'self' *.credit-suisse.com *.directnet.com *.nab.ch; 
script-src dnmb: 'self' 'unsafe-inline' 'unsafe-eval' *.credit-suisse.com 
*.directnet.com *.nab.ch ; style-src 'self' 'unsafe-inline' *.credit-suisse.com *.directnet.com *.nab.ch; img-src 'self' http://img.youtube.com data: 
*.credit-suisse.com *.directnet.com *.nab.ch; connect-src 'self' wss: ; 
font-src 'self' data:

Raiffeisen

The Raiffeisen website is the best protected of all the tested banks. The e-banking could be improved.

https://www.raiffeisen.ch/rch/de.html

CSP

This is pretty good, but it allows unsafe-eval, probably due to the javascript lib used to implement the UI. This could be improved.

Security-Policy	default-src 'self' ; script-src 'self' 'unsafe-inline' 
'unsafe-eval' assets.adobedtm.com maps.googleapis.com login.raiffeisen.ch ;
 style-src 'self' 'unsafe-inline' fonts.googleapis.com ; img-src 'self' 
statistics.raiffeisen.ch dmp.adform.net maps.googleapis.com maps.gstatic.com 
csi.gstatic.com khms0.googleapis.com khms1.googleapis.com www.homegate.ch 
dpm.demdex.net raiffeisen.demdex.net ; font-src 'self' fonts.googleapis.com 
fonts.gstatic.com ; connect-src 'self' api.raiffeisen.ch statistics.raiffeisen.ch 
www.homegate.ch prod1.solid.rolotec.ch dpm.demdex.net login.raiffeisen.ch ;
 media-src 'self' ruz.ch ; child-src * ; frame-src * ;

https://ebanking.raiffeisen.ch/

Zürcher Kantonalbank

https://www.zkb.ch/

The website is pretty bad. It has a mis-configuration in the X-Frame-Options. The e-banking login is missing most of the headers.

https://onba.zkb.ch/page/logon/logon.page

Post Finance

Post Finance is missing the CSP header and the no-referrer header in both the website and the login. This could be improved.

https://www.postfinance.ch/de/privat.html

https://www.postfinance.ch/ap/ba/fp/html/e-finance/home?login

Julius Bär

Julius Bär is missing the CSP header and the no-referrer header for the e-banking login, and the X-Frame-Options is also missing from the website.

https://www.juliusbaer.com/global/en/home/

https://ebanking.juliusbaer.com/bjbLogin/login?lang=en

Migros Bank

The website is missing a lot of headers as well.

https://www.migrosbank.ch/de/privatpersonen.html

Migro Bank provided no login link from the browser.

WIR Bank

The WIR bank have one of the best websites, and is missing the the no-referrer header. It’s e-banking solution is missing both a CSP Header as well as a referrer policy. Here the website is more secure than the e-banking, strange.

https://www.wir.ch/

CSP

frame-ancestors 'self' https://www.jobs.ch;

https://wwwsec.wir.ch/authen/login?lang=de

DC Bank

The DC Bank is missing all the security headers on the website. This could really be improved! The e-banking is better, but missing the CSP and the referrer policies.

https://www.dcbank.ch/

https://banking.dcbank.ch/login/login.jsf?bank=74&lang=de&path=layout/dcb

Basler Kantonalbank

This is an interesting test. Basler Kantonalbank has a no security headers in the website, and even an incorrect X-Frame-Options. The e-banking is good, but missing the no-referrer policy. So it has the best and the worst of the banks tested.

https://www.bkb.ch/en

https://login.bkb.ch/auth/login

CSP

default-src https://*.bkb.ch https://*.mybkb.ch; 
img-src data: https://*.bkb.ch https://*.mybkb.ch; 
script-src 'unsafe-inline' 'unsafe-eval' 
https://*.bkb.ch https://*.mybkb.ch; style-src 
https://*.bkb.ch https://*.mybkb.ch 'unsafe-inline';

Berner Kantonalbank

https://www.bekb.ch/

The Berner Kantonalbank has implemented 2 security headers on the website , but is missing the HSTS header. The e-banking is missing 2 of the security headers, no-referrer policy and the CSP.

CSP

frame-ancestors 'self'

https://banking.bekb.ch/login/login.jsf?bank=5&lang=de&path=layout/bekb

Valiant

Valiant has one of the better websites, but the worst e-banking concerning the security headers. Only has the X-Frame-Options supported.

https://www.valiant.ch/privatkunden

https://wwwsec.valiant.ch/authen/login

St. Galler Kantonalbank

The website is an A-Grade, but missing 2 headers, the X-Frame-Options and the no-referrer header. The e-banking is less protected compared to the website, has a grade B. It is missing the CSP and the referrer policy.

https://www.sgkb.ch/

CSP

default-src 'self' 'unsafe-inline' 'unsafe-eval' recruitingapp-1154.umantis.com 
*.googleapis.com *.gstatic.com prod1.solid.rolotec.ch beta.idisign.ch 
test.idisign.ch dis.swisscom.ch www.newhome.ch www.wuestpartner.com; 
img-src * data: android-webview-video-poster:; font-src * data:

https://www.onba.ch/login/login

Thurgauer Kantonalbank

The Thurgauer website is missing all the security headers, not even the HSTS supported, and the e-banking is missing the CSP and the no-referrer headers.

https://www.tkb.ch/

https://banking.tkb.ch/login/login

J. Safra Sarasin

J. Safra Sarasin website uses most security headers, it is only missing the no-referrer header. The e-banking webite is missing the CSP and the referrer headers.

https://www.jsafrasarasin.ch

CSP

frame-ancestors 'self'

https://ebanking-ch.jsafrasarasin.com/ebankingLogin/login

It would be nice if the this part of the security could be improved for all of these websites.

Supporting both Local and Windows Authentication in ASP.NET Core MVC using IdentityServer4

$
0
0

This article shows how to setup an ASP.NET Core MVC application to support both users who can login in with a local login account, solution specific, or use a windows authentication login. The identity created from the windows authentication could then be allowed to do different tasks, for example administration, or a user from the local authentication could be used for guest accounts, etc. To do this, IdentityServer4 is used to handle the authentication. The ASP.NET Core MVC application uses the OpenID Connect Hybrid Flow.

Code: https://github.com/damienbod/AspNetCoreWindowsAuth

Posts in this series:

Setting up the STS using IdentityServer4

The STS is setup using the IdentityServer4 dotnet templates. Once installed, the is4aspid template was used to create the application from the command line.

The windows authentication is activated in the launchSettings.json. To setup the windows authentication for the deployment, refer to the Microsoft Docs.

{
  "iisSettings": {
    "windowsAuthentication": true,
    "anonymousAuthentication": true,
    "iisExpress": {
      "applicationUrl": "https://localhost:44364/",
      "sslPort": 44364
    }
  },

The OpenID Connect Hybrid Flow was then configured for the client application.

new Client
{
	ClientId = "hybridclient",
	ClientName = "MVC Client",

	AllowedGrantTypes = GrantTypes.HybridAndClientCredentials,
	ClientSecrets = { new Secret("hybrid_flow_secret".Sha256()) },

	RedirectUris = { "https://localhost:44381/signin-oidc" },
	FrontChannelLogoutUri = "https://localhost:44381/signout-oidc",
	PostLogoutRedirectUris = { "https://localhost:44381/signout-callback-oidc" },

	AllowOfflineAccess = true,
	AllowedScopes = { "openid", "profile", "offline_access",  "scope_used_for_hybrid_flow" }
}

ASP.NET Core MVC Hybrid Client

The ASP.NET Core MVC application is configured to authenticate using the STS server, and to save the tokens in a cookie. The AddOpenIdConnect method configures the OIDC Hybrid client, which must match the settings in the IdentityServer4 application.

The TokenValidationParameters MUST be used, to set the NameClaimType property, otherwise the User.Identity.Name property will be null. This value is returned in the ‘name’ claim, which is not the default.

services.AddAuthentication(options =>
{
	options.DefaultScheme = CookieAuthenticationDefaults.AuthenticationScheme;
	options.DefaultChallengeScheme = OpenIdConnectDefaults.AuthenticationScheme;
})
.AddCookie()
.AddOpenIdConnect(options =>
{
	options.SignInScheme = "Cookies";
	options.Authority = stsServer;
	options.RequireHttpsMetadata = true;
	options.ClientId = "hybridclient";
	options.ClientSecret = "hybrid_flow_secret";
	options.ResponseType = "code id_token";
	options.GetClaimsFromUserInfoEndpoint = true;
	options.Scope.Add("scope_used_for_hybrid_flow");
	options.Scope.Add("profile");
	options.Scope.Add("offline_access");
	options.SaveTokens = true;
	// Set the correct name claim type
	options.TokenValidationParameters = new TokenValidationParameters
	{
		NameClaimType = "name"
	};
});

Then all controllers can be secured using the Authorize attribute. The anti forgery cookie should also be used, because the application uses cookies to store the tokens.

[Authorize]
public class HomeController : Controller
{

Displaying the login type in the ASP.NET Core Client

Then application then displays the authentication type in the home view. To do this, a requireWindowsProviderPolicy policy is defined, which requires that the identityprovider claim has the value Windows. The policy is added using the AddAuthorization method options.

var requireWindowsProviderPolicy = new AuthorizationPolicyBuilder()
 .RequireClaim("http://schemas.microsoft.com/identity/claims/identityprovider", "Windows")
 .Build();

services.AddAuthorization(options =>
{
	options.AddPolicy(
	  "RequireWindowsProviderPolicy", 
	  requireWindowsProviderPolicy
	);
});

The policy can then be used in the cshtml view.

@using Microsoft.AspNetCore.Authorization
@inject IAuthorizationService AuthorizationService
@{
    ViewData["Title"] = "Home Page";
}

<br />

@if ((await AuthorizationService.AuthorizeAsync(User, "RequireWindowsProviderPolicy")).Succeeded)
{
    <p>Hi Admin, you logged in with an internal Windows account</p>
}
else
{
    <p>Hi local user</p>

}

Both applications can then be started. The client application is redirected to the STS server and the user can login with either the Windows authentication, or a local account.

The text in the client application is displayed depending on the Identity returned.

Identity created for the Windows Authentication:

Local Identity:

Next Steps

The application now works for Windows authentication, or a local account authentication. The authorization now needs to be set, so that the different types have different claims. The identities returned from the Windows Authentication will have different claims, to the identities returned form the local logon, which will be used for guest accounts.

Links:

https://docs.microsoft.com/en-us/aspnet/core/security/authorization/views?view=aspnetcore-2.1&tabs=aspnetcore2x

https://docs.microsoft.com/en-us/aspnet/core/security/authentication/?view=aspnetcore-2.1

https://mva.microsoft.com/en-US/training-courses/introduction-to-identityserver-for-aspnet-core-17945

https://stackoverflow.com/questions/34951713/aspnet5-windows-authentication-get-group-name-from-claims/34955119

https://github.com/IdentityServer/IdentityServer4.Templates

https://docs.microsoft.com/en-us/iis/configuration/system.webserver/security/authentication/windowsauthentication/


ASP.NET Core Authorization for Windows, Local accounts

$
0
0

This article shows how authorization could be implemented for an ASP.NET Core MVC application. The authorization logic is extracted into a separate project, which is required by some certification software requirements. This could also be deployed as a separate service.

Code: https://github.com/damienbod/AspNetCoreWindowsAuth

Blogs in this series:

Application Authorization Service

The authorization service uses the claims returned for the identity of the MVC application. The claims are returned from the ASP.NET Core MVC client app which authenticates using the OpenID Connect Hybrid flow. The values are then used to create or define the authorization logic.

The authorization service supports a single API method, IsAdmin. This method checks if the username is a defined admin, and that the person/client used a Windows account to login.

using System;

namespace AppAuthorizationService
{
    public class AppAuthorizationService : IAppAuthorizationService
    {
        public bool IsAdmin(string username, string providerClaimValue)
        {
            return RulesAdmin.IsAdmin(username, providerClaimValue);
        }
    }
}

The rules define the authorization process. This is just a simple static configuration class, but any database, configuration files, authorization API could be used to check, define the rules.

In this example, the administrators are defined in the class, and the Windows value is checked for the claim parameter.

using System;
using System.Collections.Generic;
using System.Text;

namespace AppAuthorizationService
{
    public static class RulesAdmin
    {

        private static List<string> adminUsers = new List<string>();

        private static List<string> adminProviders = new List<string>();

        public static bool IsAdmin(string username, string providerClaimValue)
        {
            if(adminUsers.Count == 0)
            {
                AddAllowedUsers();
                AddAllowedProviders();
            }

            if (adminUsers.Contains(username) && adminProviders.Contains(providerClaimValue))
            {
                return true;
            }

            return false;
        }

        private static void AddAllowedUsers()
        {
            adminUsers.Add("SWISSANGULAR\\Damien");
        }

        private static void AddAllowedProviders()
        {
            adminProviders.Add("Windows");
        }
    }
}

ASP.NET Core Policies

The application authorization service also defines the ASP.NET Core policies which can be used by the client application. An IAuthorizationRequirement is implemented.

using Microsoft.AspNetCore.Authorization;
 
namespace AppAuthorizationService
{
    public class IsAdminRequirement : IAuthorizationRequirement{}
}

The IAuthorizationRequirement implementation is then used in the AuthorizationHandler implementation IsAdminHandler. This handler checks, validates the claims, using the IAppAuthorizationService service.

using Microsoft.AspNetCore.Authorization;
using System;
using System.Linq;
using System.Threading.Tasks;

namespace AppAuthorizationService
{
    public class IsAdminHandler : AuthorizationHandler<IsAdminRequirement>
    {
        private IAppAuthorizationService _appAuthorizationService;

        public IsAdminHandler(IAppAuthorizationService appAuthorizationService)
        {
            _appAuthorizationService = appAuthorizationService;
        }

        protected override Task HandleRequirementAsync(AuthorizationHandlerContext context, IsAdminRequirement requirement)
        {
            if (context == null)
                throw new ArgumentNullException(nameof(context));
            if (requirement == null)
                throw new ArgumentNullException(nameof(requirement));

            var claimIdentityprovider = context.User.Claims.FirstOrDefault(t => t.Type == "http://schemas.microsoft.com/identity/claims/identityprovider");

            if (claimIdentityprovider != null && _appAuthorizationService.IsAdmin(context.User.Identity.Name, claimIdentityprovider.Value))
            {
                context.Succeed(requirement);
            }

            return Task.CompletedTask;
        }
    }
}

As an example, a second policy is also defined, which checks that the http://schemas.microsoft.com/identity/claims/identityprovider claim has a Windows value.

using Microsoft.AspNetCore.Authorization;

namespace AppAuthorizationService
{
    public static class MyPolicies
    {
        private static AuthorizationPolicy requireWindowsProviderPolicy;

        public static AuthorizationPolicy GetRequireWindowsProviderPolicy()
        {
            if (requireWindowsProviderPolicy != null) return requireWindowsProviderPolicy;

            requireWindowsProviderPolicy = new AuthorizationPolicyBuilder()
                  .RequireClaim("http://schemas.microsoft.com/identity/claims/identityprovider", "Windows")
                  .Build();

            return requireWindowsProviderPolicy;
        }
    }
}

Using the Authorization Service and Policies

The Authorization can then be used, by adding the services to the Startup of the client application.

services.AddSingleton<IAppAuthorizationService, AppAuthorizationService.AppAuthorizationService>();
services.AddSingleton<IAuthorizationHandler, IsAdminHandler>();

services.AddAuthorization(options =>
{
	options.AddPolicy("RequireWindowsProviderPolicy", MyPolicies.GetRequireWindowsProviderPolicy());
	options.AddPolicy("IsAdminRequirementPolicy", policyIsAdminRequirement =>
	{
		policyIsAdminRequirement.Requirements.Add(new IsAdminRequirement());
	});
});

The policies can then be used in a controller and validate that the IsAdminRequirementPolicy is fulfilled.

using Microsoft.AspNetCore.Authorization;
using Microsoft.AspNetCore.Mvc;

namespace MvcHybridClient.Controllers
{
    [Authorize(Policy = "IsAdminRequirementPolicy")]
    public class AdminController : Controller
    {
        public IActionResult Index()
        {
            return View();
        }
    }
}

Or the IAppAuthorizationService can be used directly if you wish to mix authorization within a controller.

private IAppAuthorizationService _appAuthorizationService;

public HomeController(IAppAuthorizationService appAuthorizationService)
{
	_appAuthorizationService = appAuthorizationService;
}

public IActionResult Index()
{
	// Windows or local => claim http://schemas.microsoft.com/identity/claims/identityprovider
	var claimIdentityprovider = 
	  User.Claims.FirstOrDefault(t => 
	    t.Type == "http://schemas.microsoft.com/identity/claims/identityprovider");

	if (claimIdentityprovider != null && 
	  _appAuthorizationService.IsAdmin(
	     User.Identity.Name, 
		 claimIdentityprovider.Value)
	)
	{
		// yes, this is an admin
		Console.WriteLine("This is an admin, we can do some specific admin logic!");
	}

	return View();
}

If an admin user from Windows logged in, the admin view can be accessed.

Or the local guest user only sees the home view.


Notes:

This is a good way of separating the authorization logic from the business application in your software. Some certified software processes, require that the application authorization, authentication is audited before each release, for each new deployment if anything changed.
By separating the logic, you can deploy, update the business application without doing a security audit. The authorization process could also be deployed to a separate process if required.

Links:

https://docs.microsoft.com/en-us/aspnet/core/security/authorization/views?view=aspnetcore-2.1&tabs=aspnetcore2x

https://docs.microsoft.com/en-us/aspnet/core/security/authentication/?view=aspnetcore-2.1

https://mva.microsoft.com/en-US/training-courses/introduction-to-identityserver-for-aspnet-core-17945

https://stackoverflow.com/questions/34951713/aspnet5-windows-authentication-get-group-name-from-claims/34955119

https://github.com/IdentityServer/IdentityServer4.Templates

https://docs.microsoft.com/en-us/iis/configuration/system.webserver/security/authentication/windowsauthentication/

OAuth Authentication with PKCE for a .NET Core Console Native Application

$
0
0

This article shows how to use a .NET Core console application securely with an API using the RFC 7636 specification. The app logs into IdentityServer4 using the OIDC authorization code flow with a PKCE (Proof Key for Code Exchange). The app can then use the access token to consume data from a secure API. This would be useful for power shell script clients, or .NET Core console apps. Identity.Model.Samples provide a whole range of native client examples, and this code was built using the .NET Core native code example.

Code: https://github.com/damienbod/AspNetCoreWindowsAuth

Native App PKCE Authorization Code Flow

The RFC 7636 specification provides a safe way in which native applications can get access tokens to use with secure applications. Native applications have similar problems to web applications, single sign on is required sometimes, the native apps may not handle passwords, the server requires a way of validating the identity, and the client app requires a way of validating the token and so on.

The RFC 7636 provides one of the best ways of doing this and by using a RFC standard, tested libraries which implement this, can be used. There is no need to re-invent the wheel.

Flow overview src: 1.1. Protocol Flow

The Proof Key for Code Exchange by OAuth Public Clients was designed so that the code cannot be intercepted in the Authorization Code Flow and used to get an access token. This can help for example, when the code is leaked to shared logs on a mobile device and a malicious application uses this to get an access token.

The extra protection is added on this flow by using a code_verifier, code_challenge and a code_challenge_method. The code_challenge and the code_challenge_method are sent to the server with the authorization request. The code_challenge is the derived version of the code_verifier. When requesting the access token, the code_verifier is sent to the server, and this is then validated on the OIDC server using the values sent in the orignal authorization request.

STS Server Configuration

On IdentityServer4 ,the Proof Key for Code Exchange by OAuth can be configured as follows:

new Client
{
	ClientId = "native.code",
	ClientName = "Native Client (Code with PKCE)",

	RedirectUris = { "http://127.0.0.1:45656" },
	PostLogoutRedirectUris = { "http://127.0.0.1:45656" },

	RequireClientSecret = false,

	AllowedGrantTypes = GrantTypes.Code,
	RequirePkce = true,
	AllowedScopes = { "openid", "profile", "email", "native_api" },

	AllowOfflineAccess = true,
	RefreshTokenUsage = TokenUsage.ReUse
 }

The RequirePkce is set to true, and no secrets are used, unlike the Authorization Code flow for web applications, as it makes no sense on public mobile native devices. Depending on the native device, the RedirectUris can be configured as required.

Native client using .NET Core

Implementing the client for a .NET Core application is really easy thanks to the IdentityModel.OidcClient nuget package and the examples provided on github. This repo provides reference examples for lots of different native client types, really impressive.

This example was built used the following project: .NET Core Native Code

IdentityModel.OidcClient takes care of the PKCE handling and the flow.

The login can be implemented as follows:

private static async Task Login()
{
	var browser = new SystemBrowser(45656);
	string redirectUri = "http://127.0.0.1:45656";

	var options = new OidcClientOptions
	{
		Authority = _authority,
		ClientId = "native.code",
		RedirectUri = redirectUri,
		Scope = "openid profile native_api",
		FilterClaims = false,
		Browser = browser,
		Flow = OidcClientOptions.AuthenticationFlow.AuthorizationCode,
		ResponseMode = OidcClientOptions.AuthorizeResponseMode.Redirect,
		LoadProfile = true
	};

	_oidcClient = new OidcClient(options); 
	 var result = await _oidcClient.LoginAsync(new LoginRequest());
	 ShowResult(result);
}

The SystemBrowser class uses this implementation from the IdentityModel.OidcClient samples. The results can be displayed as follows:

private static void ShowResult(LoginResult result)
{
	if (result.IsError)
	{
		Console.WriteLine("\n\nError:\n{0}", result.Error);
		return;
	}

	Console.WriteLine("\n\nClaims:");
	foreach (var claim in result.User.Claims)
	{
		Console.WriteLine("{0}: {1}", claim.Type, claim.Value);
	}

	Console.WriteLine($"\nidentity token: {result.IdentityToken}");
	Console.WriteLine($"access token:   {result.AccessToken}");
	Console.WriteLine($"refresh token:  {result?.RefreshToken ?? "none"}");
}

And the API can be called then using the access token.

private static async Task CallApi(string currentAccessToken)
{
	_apiClient.SetBearerToken(currentAccessToken);
	var response = await _apiClient.GetAsync("");

	if (response.IsSuccessStatusCode)
	{
		var json = JArray.Parse(await response.Content.ReadAsStringAsync());
		Console.WriteLine(json);
	}
	else
	{
		Console.WriteLine($"Error: {response.ReasonPhrase}");
	}
}

The IdentityModel.OidcClient can be used to implement almost any native device which needs to or should implement the Proof Key for Code Exchange by OAuth for authorization. There is no need to do the password handling in your native application.

Links:

http://openid.net/2015/05/26/enhancing-oauth-security-for-mobile-applications-with-pkse/

https://tools.ietf.org/html/rfc7636

https://github.com/IdentityModel/IdentityModel.OidcClient.Samples

https://connect2id.com/blog/connect2id-server-3.9

https://www.davidbritch.com/2017/08/using-pkce-with-identityserver-from_9.html

https://developer.okta.com/authentication-guide/implementing-authentication/auth-code-pkce

OAuth 2.0 and PKCE

https://community.apigee.com/questions/47397/why-do-we-need-pkce-specification-rfc-7636-in-oaut.html

Uploading and sending image messages with ASP.NET Core SignalR

$
0
0

This article shows how images could be uploaded using a file upload with a HTML form in an ASP.MVC Core view, and then sent to application clients using SignalR. The images are uploaded as an ICollection of IFormFile objects, and sent to the SignalR clients using a base64 string. Angular is used to implement the SignalR clients.

Code https://github.com/damienbod/AspNetCoreAngularSignalR

Posts in this series

SignalR Server

The SignalR Hub is really simple. This implements a single method which takes an ImageMessage type object as a parameter.

using System.Threading.Tasks;
using AspNetCoreAngularSignalR.Model;
using Microsoft.AspNetCore.SignalR;

namespace AspNetCoreAngularSignalR.SignalRHubs
{
    public class ImagesMessageHub : Hub
    {
        public Task ImageMessage(ImageMessage file)
        {
            return Clients.All.SendAsync("ImageMessage", file);
        }
    }
}

The ImageMessage class has two properties, one for the image byte array, and a second for the image information, which is required so that the client application can display the image.

public class ImageMessage
{
	public byte[] ImageBinary { get; set; }
	public string ImageHeaders { get; set; }
}

In this example, SignalR is added to the ASP.NET Core application in the Startup class, but this could also be done directly in the kestrel server. The AddSignalR middleware is added and then each Hub explicitly with a defined URL in the Configure method.

public void ConfigureServices(IServiceCollection services)
{
	...
	
	services.AddTransient<ValidateMimeMultipartContentFilter>();

	services.AddSignalR()
	  .AddMessagePackProtocol();

	services.AddMvc().SetCompatibilityVersion(CompatibilityVersion.Version_2_1);
}

public void Configure(IApplicationBuilder app, IHostingEnvironment env, ILoggerFactory loggerFactory)
{
	...

	app.UseSignalR(routes =>
	{
		routes.MapHub<ImagesMessageHub>("/zub");
	});

	app.UseMvc(routes =>
	{
		routes.MapRoute(
			name: "default",
			template: "{controller=FileClient}/{action=Index}/{id?}");
	});
}

A File Upload ASP.NET Core MVC controller is implemented to support the file upload. The SignalR IHubContext interface is added per dependency injection for the type ImagesMessageHub. When files are uploaded, the IFormFile collection which contain the images are read to memory and sent as a byte array to the SignalR clients. Maybe this could be optimized.

using System;
using System.Collections.Generic;
using System.IO;
using System.Threading.Tasks;
using AspNetCoreAngularSignalR.Model;
using AspNetCoreAngularSignalR.SignalRHubs;
using Microsoft.AspNetCore.Mvc;
using Microsoft.AspNetCore.SignalR;
using Microsoft.Net.Http.Headers;

namespace AspNetCoreAngularSignalR.Controllers
{
    [Route("api/[controller]")]
    public class FileUploadController : Controller
    {
        private readonly IHubContext<ImagesMessageHub> _hubContext;

        public FileUploadController(IHubContext<ImagesMessageHub> hubContext)
        {
            _hubContext = hubContext;
        }

        [Route("files")]
        [HttpPost]
        [ServiceFilter(typeof(ValidateMimeMultipartContentFilter))]
        public async Task<IActionResult> UploadFiles(FileDescriptionShort fileDescriptionShort)
        {
            if (ModelState.IsValid)
            {
                foreach (var file in fileDescriptionShort.File)
                {
                    if (file.Length > 0)
                    {
                        using (var memoryStream = new MemoryStream())
                        {
                            await file.CopyToAsync(memoryStream);

                            var imageMessage = new ImageMessage
                            {
                                ImageHeaders = "data:" + file.ContentType + ";base64,",
                                ImageBinary = memoryStream.ToArray()
                            };

                            await _hubContext.Clients.All.SendAsync("ImageMessage", imageMessage);
                        }
                    }
                }
            }

            return Redirect("/FileClient/Index");
        }
    }
}


SignalR Angular Client

The Angular SignalR client uses the HubConnection to receive ImageMessage messages. Each message is pushed to the client array which is used to display the images. The @aspnet/signalr npm package is required to use the HubConnection.

import { Component, OnInit } from '@angular/core';
import { HubConnection } from '@aspnet/signalr';
import * as signalR from '@aspnet/signalr';

import { ImageMessage } from '../imagemessage';

@Component({
    selector: 'app-images-component',
    templateUrl: './images.component.html'
})

export class ImagesComponent implements OnInit {
    private _hubConnection: HubConnection | undefined;
    public async: any;
    message = '';
    messages: string[] = [];

    images: ImageMessage[] = [];

    constructor() {
    }

    ngOnInit() {
        this._hubConnection = new signalR.HubConnectionBuilder()
            .withUrl('https://localhost:44324/zub')
            .configureLogging(signalR.LogLevel.Trace)
            .build();

        this._hubConnection.stop();

        this._hubConnection.start().catch(err => {
            console.error(err.toString())
        });

        this._hubConnection.on('ImageMessage', (data: any) => {
            console.log(data);
            this.images.push(data);
        });
    }
}

The Angular template displays the images using the header and the binary data properties.

<div class="container-fluid">

    <h1>Images</h1>

   <a href="https://localhost:44324/FileClient/Index" target="_blank">Upload Images</a> 

    <div class="row" *ngIf="images.length > 0">
        <img *ngFor="let image of images;" 
        width="150" style="margin-right:5px" 
        [src]="image.imageHeaders + image.imageBinary">
    </div>
</div>

File Upload

The images are uploaded using an ASP.NET Core MVC View which uses a multiple file input HTML control. This sends the files to the MVC Controller as a multipart/form-data request.

<form enctype="multipart/form-data" method="post" action="https://localhost:44324/api/FileUpload/files" id="ajaxUploadForm" novalidate="novalidate">

    <fieldset>
        <legend style="padding-top: 10px; padding-bottom: 10px;">Upload Images</legend>

        <div class="col-xs-12" style="padding: 10px;">
            <div class="col-xs-4">
                <label>Upload</label>
            </div>
            <div class="col-xs-7">
                <input type="file" id="fileInput" name="file" multiple>
            </div>
        </div>

        <div class="col-xs-12" style="padding: 10px;">
            <div class="col-xs-4">
                <input type="submit" value="Upload" id="ajaxUploadButton" class="btn">
            </div>
            <div class="col-xs-7">

            </div>
        </div>

    </fieldset>

</form>

When the application is run, n instances of the clients can be opened. Then one can be used to upload images to all the other SignalR clients.

This soultion works good, but has many ways, areas which could be optimized for performance.

Links

https://github.com/aspnet/SignalR

https://github.com/aspnet/SignalR#readme

https://radu-matei.com/blog/signalr-core/

https://www.npmjs.com/package/@aspnet/signalr-client

https://msgpack.org/

https://stackoverflow.com/questions/40214772/file-upload-in-angular?utm_medium=organic&utm_source=google_rich_qa&utm_campaign=google_rich_qa

https://stackoverflow.com/questions/39272970/angular-2-encode-image-to-base64?utm_medium=organic&utm_source=google_rich_qa&utm_campaign=google_rich_qa

Dynamic CSS in an ASP.NET Core MVC View Component

$
0
0

This post shows how a view with dynamic css styles could be implemented using an MVC view component in ASP.NET Core. The values are changed using a HTML form with ASP.NET Core tag helpers, and passed into the view component which displays the view using css styling. The styles are set at runtime.

Code: https://github.com/damienbod/AspNetCoreMvcDynamicViews

Creating the View Component

The View Component is a nice way of implementing components in ASP.NET Core MVC. The view component is saved in the \Views\Shared\Components\DynamicDisplay folder which fulfils some of the standard paths which are pre-defined by ASP.NET Core. This can be changed, but I always try to use the defaults where possible.

The DynamicDisplay class implements the ViewComponent class, which has a single async method InvokeAsync that returns a Task with the IViewComponentResult type.

using AspNetCoreMvcDynamicViews.Views.Shared.Components.DynamicDisplay;
using Microsoft.AspNetCore.Mvc;
using System.Threading.Tasks;

namespace AspNetCoreMvcDynamicViews.Views.Home.ViewComponents
{
    [ViewComponent(Name = "DynamicDisplay")]
    public class DynamicDisplay : ViewComponent
    {
        public async Task<IViewComponentResult> InvokeAsync(DynamicDisplayModel dynamicDisplayModel)
        {
            return View(await Task.FromResult(dynamicDisplayModel));
        }
    }
}

The view component uses a simple view model with some helper methods to make it easier to use the data in a cshtml view.

namespace AspNetCoreMvcDynamicViews.Views.Shared.Components.DynamicDisplay
{
    public class DynamicDisplayModel
    {
        public int NoOfHoles { get; set; } = 2;

        public int BoxHeight { get; set; } = 100;

        public int NoOfBoxes { get; set; } = 2;

        public int BoxWidth { get; set; } = 200;

        public string GetAsStringWithPx(int value)
        {
            return $"{value}px";
        }

        public string GetDisplayHeight()
        {
            return $"{BoxHeight + 50 }px";
        }

        public string GetDisplayWidth()
        {
            return $"{BoxWidth * NoOfBoxes}px";
        }
    }
}

The cshtml view uses both css classes and styles to do a dynamic display of the data.

@using AspNetCoreMvcDynamicViews.Views.Shared.Components.DynamicDisplay
@model DynamicDisplayModel

<div style="height:@Model.GetDisplayHeight(); width:@Model.GetDisplayWidth()">
    @for (var i = 0; i < Model.NoOfBoxes; i++)
    {
    <div class="box" style="width:@Model.GetAsStringWithPx(Model.BoxWidth);height:@Model.GetAsStringWithPx(Model.BoxHeight);">
        @if (Model.NoOfHoles == 4)
        {
            @await Html.PartialAsync("./FourHolesPartial.cshtml")
        }
        else if (Model.NoOfHoles == 2)
        {
            @await Html.PartialAsync("./TwoHolesPartial.cshtml")
        }
        else if (Model.NoOfHoles == 1)
        {
            <div class="row justify-content-center align-items-center" style="height:100%">
                <span class="dot" style=""></span>
            </div>
        }
    </div>
    }
</div>

Partial views are used inside the view component to display some of the different styles. The partial view is added using the @await Html.PartialAsync call. The box with the four holes is implemented in a partial view.

<div class="row" style="height:50%">
    <div class="col-6">
        <span class="dot" style="float:left;"></span>
    </div>
    <div class="col-6">
        <span class="dot" style="float:right;"></span>
    </div>
</div>

<div class="row align-items-end" style="height:50%">
    <div class="col-6">
        <span class="dot" style="float:left;"></span>
    </div>
    <div class="col-6">
        <span class="dot" style="float:right;"></span>
    </div>
</div>

And CSS classes are used to display the data.

.dot {
	height: 25px;
	width: 25px;
	background-color: #bbb;
	border-radius: 50%;
	display: inline-block;
}

.box {
	float: left;
	height: 100px;
	border: 1px solid gray;
	padding: 5px;
	margin: 5px;
	margin-left: 0;
	margin-right: -1px;
}

Using the View Component

The view component is then used in a cshtml view. This view implements the form which sends the data to the server. The view component is added using the Component.InvokeAsync method which takes only a model as a parameter and then name of the view component.

@using AspNetCoreMvcDynamicViews.Views.Shared.Components.DynamicDisplay
@model MyDisplayModel
@{
    ViewData["Title"] = "Home Page";
}

<div style="padding:20px;"></div>

<form asp-controller="Home" asp-action="Index" method="post">
    <div class="col-md-12">

        @*<div class="form-group row">
            <label  class="col-sm-3 col-form-label font-weight-bold">Circles</label>
            <div class="col-sm-9">
                <select class="form-control" asp-for="mmm" asp-items="mmmItmes"></select>
            </div>
        </div>*@

        <div class="form-group row">
            <label class="col-sm-5 col-form-label font-weight-bold">No of Holes</label>
            <select class="col-sm-5 form-control" asp-for="DynamicDisplayData.NoOfHoles">
                <option value="0" selected>No Holes</option>
                <option value="1">1 Hole</option>
                <option value="2">2 Holes</option>
                <option value="4">4 Holes</option>
            </select>
        </div>

        <div class="form-group row">
            <label class="col-sm-5 col-form-label font-weight-bold">Height in mm</label>
            <input class="col-sm-5 form-control" asp-for="DynamicDisplayData.BoxHeight" type="number" min="65" max="400" />
        </div>

        <div class="form-group row">
            <label class="col-sm-5 col-form-label font-weight-bold">No. of Boxes</label>
            <input class="col-sm-5 form-control" asp-for="DynamicDisplayData.NoOfBoxes" type="number" min="1" max="7" />
        </div>

        <div class="form-group row">
            <label class="col-sm-5 col-form-label font-weight-bold">Box Width</label>
            <input class="col-sm-5 form-control" asp-for="DynamicDisplayData.BoxWidth" type="number" min="65" max="400" />
        </div>

        <div class="form-group row">
            <button class="btn btn-primary col-sm-10" type="submit">Update</button>
        </div>

    </div>

    @await Component.InvokeAsync("DynamicDisplay", Model.DynamicDisplayData)

</form>

The MVC Controller implements two methods, one for the GET, and one for the POST. The form uses the POST to send the data to the server, so this could be saved if required.

public class HomeController : Controller
{
	[HttpGet]
	public IActionResult Index()
	{
		var model = new MyDisplayModel
		{
			DynamicDisplayData = new DynamicDisplayModel()
		};
		return View(model);
	}

	[HttpPost]
	public IActionResult Index(MyDisplayModel myDisplayModel)
	{
		// save data to db...
		return View("Index", myDisplayModel);
	}

Running the demo

When the application is started, the form is displayed, and the default values are displayed.

And when the update button is clicked, the values are visualized inside the view component.

Links:

https://docs.microsoft.com/en-us/aspnet/core/mvc/views/view-components?view=aspnetcore-2.1

https://docs.microsoft.com/en-us/aspnet/core/mvc/views/partial?view=aspnetcore-2.1

https://docs.microsoft.com/en-us/aspnet/core/mvc/views/razor?view=aspnetcore-2.1

ASP.NET Core MVC Form Requests and the Browser Back button

$
0
0

This article shows how an ASP.NET Core MVC application can request data using a HTML form so that the browser back button will work. When using a HTTP POST to request data from a server, the back button does not work, because it tries to re-submit the form data. This can be solved by using a HTTP GET, or an AJAX POST.

Code: https://github.com/damienbod/MvcDynamicDropdownList

Request data using a HTTP Post

In an ASP.NET Core MVC application, a user can request data from a server using a HTML form. The form can be set to do a POST request and when the data is returned in the response, it is displayed in the partial view using the data from the POST response.

@model MvcDynamicDropdownList.Models.DdlItems
@{
    ViewData["Title"] = "Index";
}

<h4>Back Fail Confirm Form Resubmission</h4>

<form asp-controller="Back" asp-action="SomeDataFromAPost" method="post">
    <button class="btn btn-primary" type="submit">Display</button>
</form>

@if (Model != null)
{
    @await Html.PartialAsync("SomeData", Model)
}
else
{
    <p>no display items</p>
}

The MVC Controller handles the view requests, prepares the data, and returns the views as required.

using Microsoft.AspNetCore.Mvc;
using Microsoft.AspNetCore.Mvc.Rendering;
using MvcDynamicDropdownList.Models;
using System.Collections.Generic;

namespace MvcDynamicDropdownList.Controllers
{
    public class BackController : Controller
    {
        public IActionResult IndexPost()
        {
            return View();
        }

        public IActionResult IndexGet()
        {
            return View();
        }

        // SomeDataFromAPost
        [HttpPost]
        public IActionResult SomeDataFromAPost()
        {
            var model = new DdlItems
            {
                Items = new List<SelectListItem>
                {
                    new SelectListItem { Text = "H1", Value = "H1Value"},
                    new SelectListItem { Text = "This is cool", Value = "cool"}
                }
            };
            return View("IndexPost", model);
        }

        // SomeDataFromAPostGet
        [HttpGet]
        public IActionResult SomeDataFromAGet()
        {
            var model = new DdlItems
            {
                Items = new List<SelectListItem>
                {
                    new SelectListItem { Text = "H1", Value = "H1Value"},
                    new SelectListItem { Text = "This is cool", Value = "cool"}
                }
            };
            return View("IndexGet", model);
        }
    }
}

The partial view just displays the data.

@model MvcDynamicDropdownList.Models.DdlItems

<p>display items</p>
@if (Model.Items != null)
{
    <div style="width: 200px;">
        <ol>
            @foreach (var item in Model.Items)
            {
                <li>item.Text</li>
            }
        </ol>
    </div>
}
else
{
    <p>no display items</p>
}

By doing this, when the user clicks the back button, the web application breaks and displays the following message: Confirm Form Resubmission

This is correct, because the browser thinks you are changing the data by doing a POST, or resending an UPDATE data request.

The following gif displays this:

Solving this problem using HTTP GET

The back button problem can be solved by implementing the data request in a different way. The first way would be to send a HTTP GET request, instead of a HTTP POST. Request parameters, if any, are sent in the URL and the back button will then work without problems. This could be implemented as follows:

@model MvcDynamicDropdownList.Models.DdlItems
@{
    ViewData["Title"] = "Index";
}

<h4>Back No Confirm Form Resubmission due to GET Form</h4>

<form asp-controller="Back" asp-action="SomeDataFromAGet" method="get">
    <button class="btn btn-primary" type="submit">Display</button>
</form>

@if (Model != null)
{
    @await Html.PartialAsync("SomeData", Model)
}
else
{
    <p>no display items</p>
}

Solving this problem using AJAX HTTP POST

If a POST request is required, it could be sent using AJAX, which can then send a POST request to the server. This is done in ASP.NET Core by using the data-ajax properties, and the jquery.validate.unobtrusive javascript library. Is this example, the DOM element with the content id displays the result.

@{
    ViewData["Title"] = "Home Page";
}

<h4>Back Ok, No Confirm Form Resubmission due to async</h4>

<div>
    <div>
        <form asp-controller="Home" asp-action="DynamicDropDownList" 
                 data-ajax="true" 
                 data-ajax-method="POST" 
                 data-ajax-mode="replace" 
                 data-ajax-update="#content">
            <input class="btn btn-primary" type="submit" value="getData" />
        </form>
        <div id="content"></div>

    </div>

</div>

Links:

https://docs.microsoft.com/en-us/aspnet/core/getting-started?view=aspnetcore-2.1&tabs=windows

https://docs.microsoft.com/en-us/aspnet/core/mvc/razor-pages/?view=aspnetcore-2.1&tabs=visual-studio

Viewing all 354 articles
Browse latest View live